
Joining a Live Session
Overview
Live sessions in Decode run through Decode Live, a built-in video meeting interface. There are three roles in a session: Moderator, Participant, and Observer. Each role has its own join link and a different set of features inside the session. This article covers how each role joins and what each feature does.
MODERATOR
The moderator leads the session. They control who enters the room, guide the conversation, and manage all session activity from start to finish.
How to Join
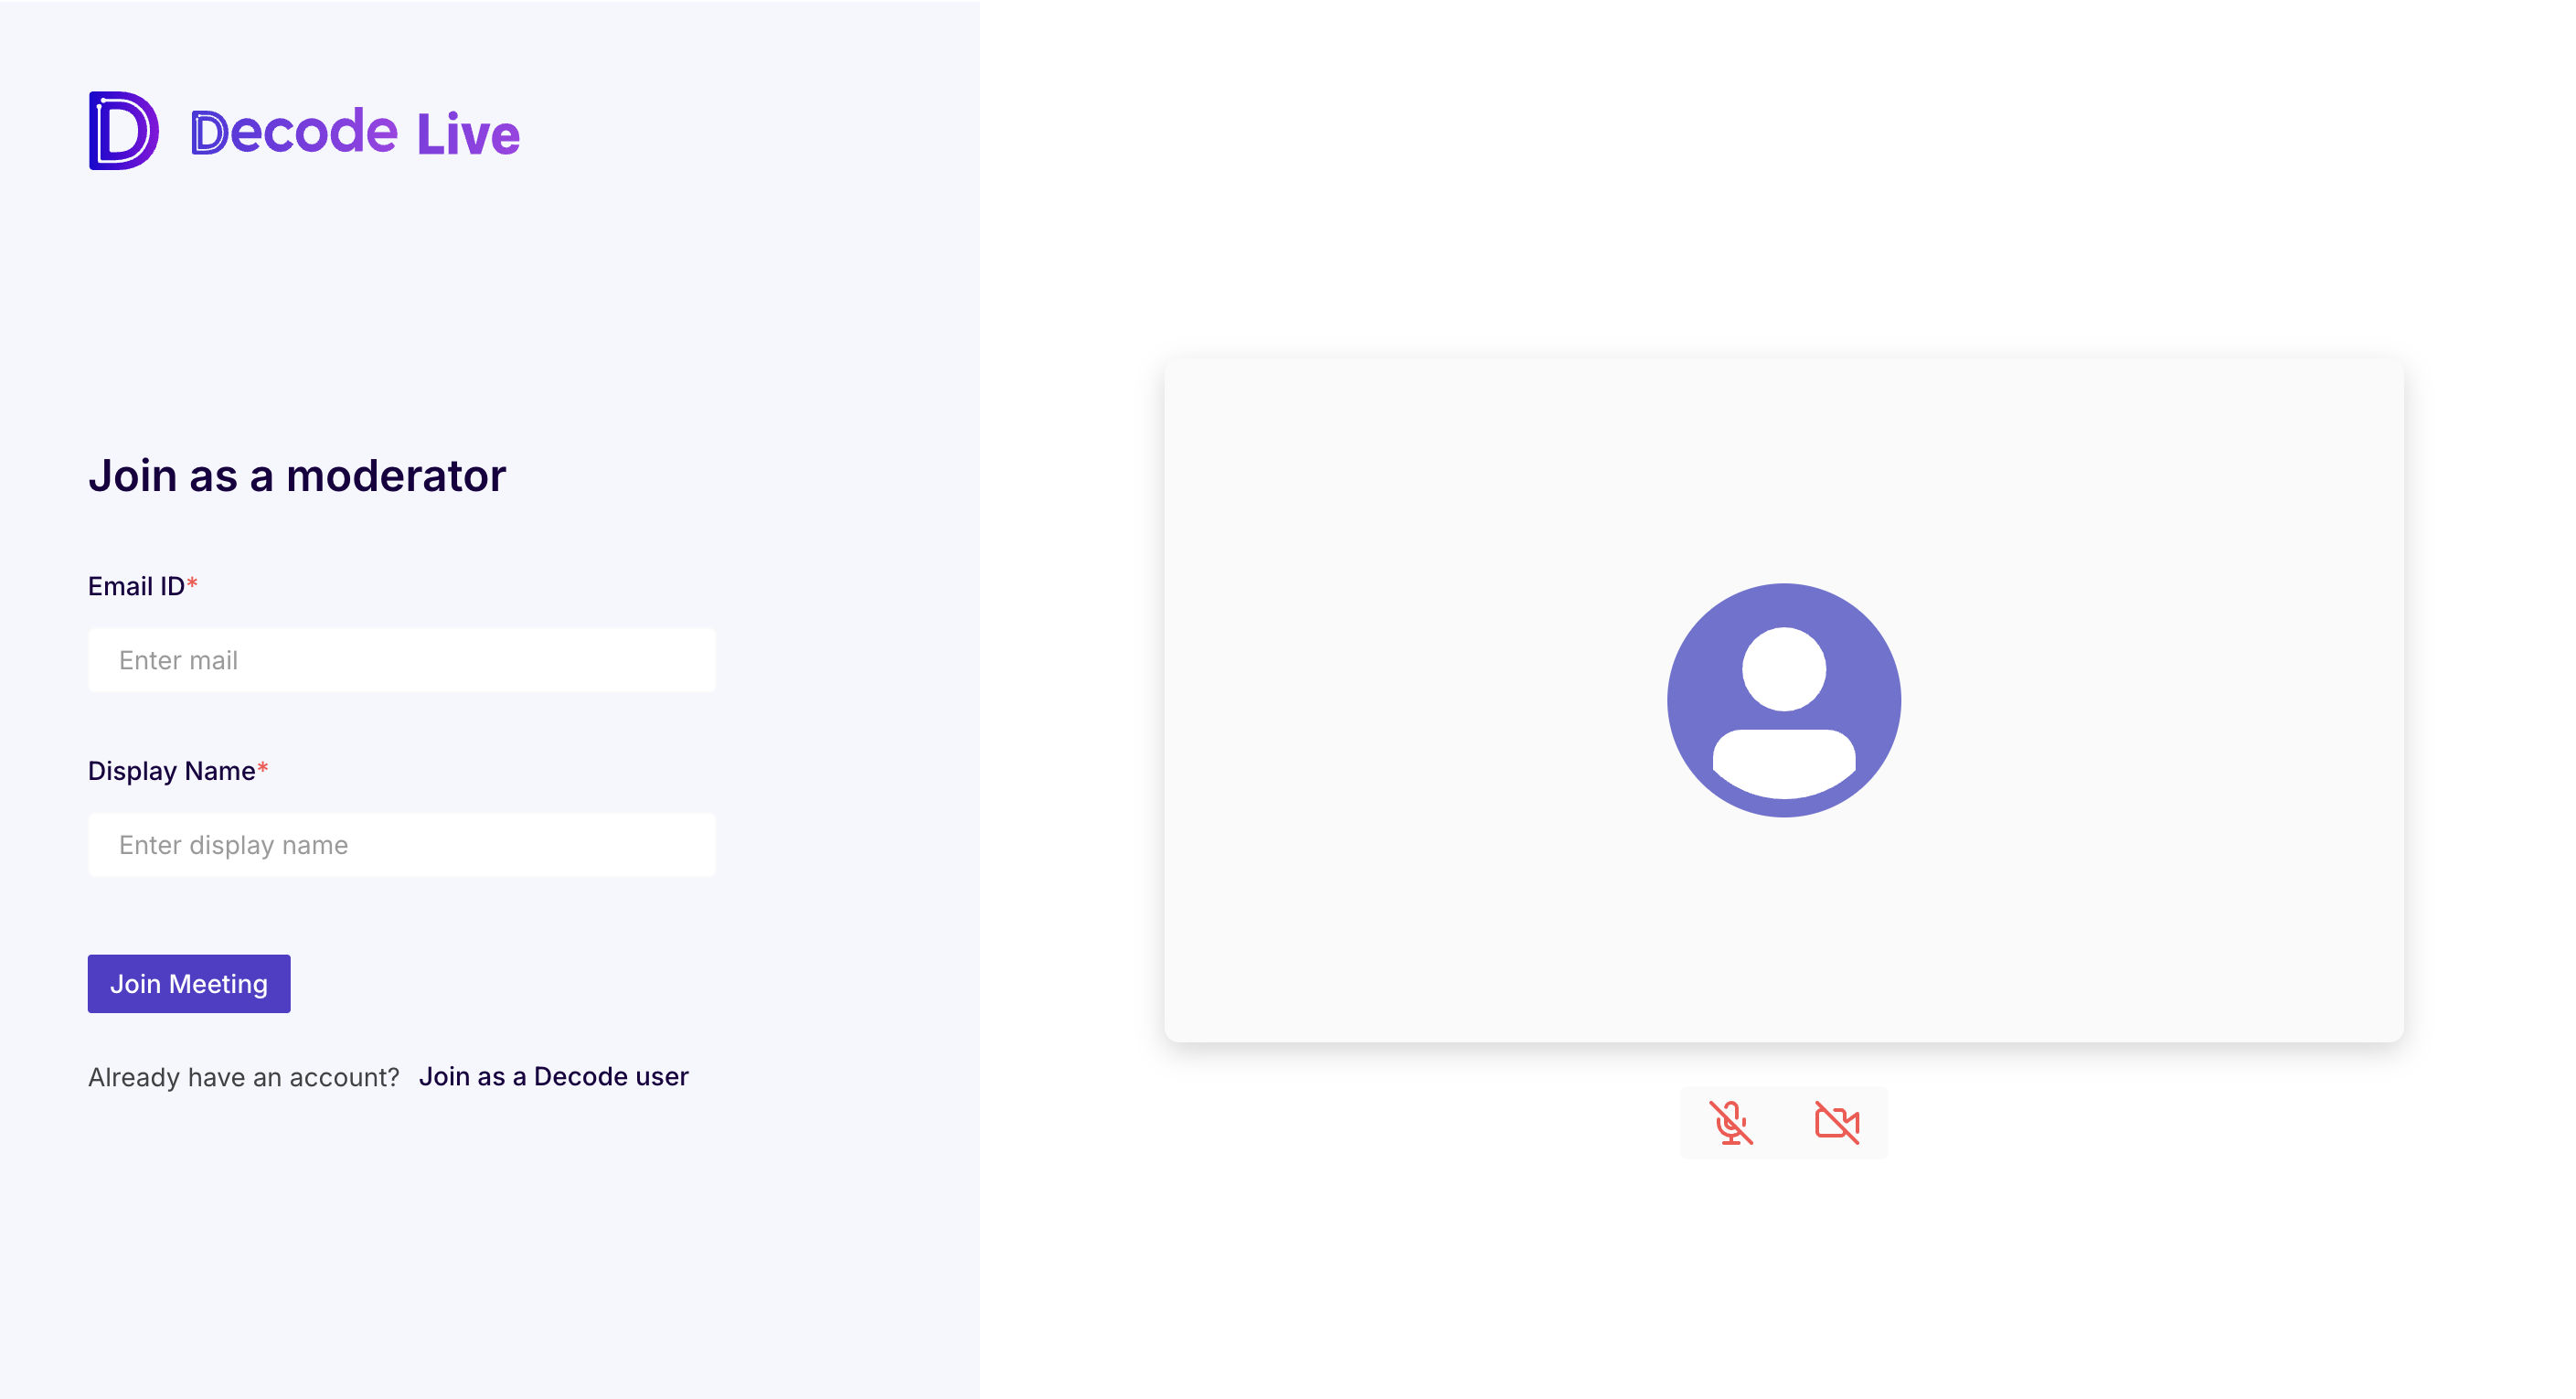
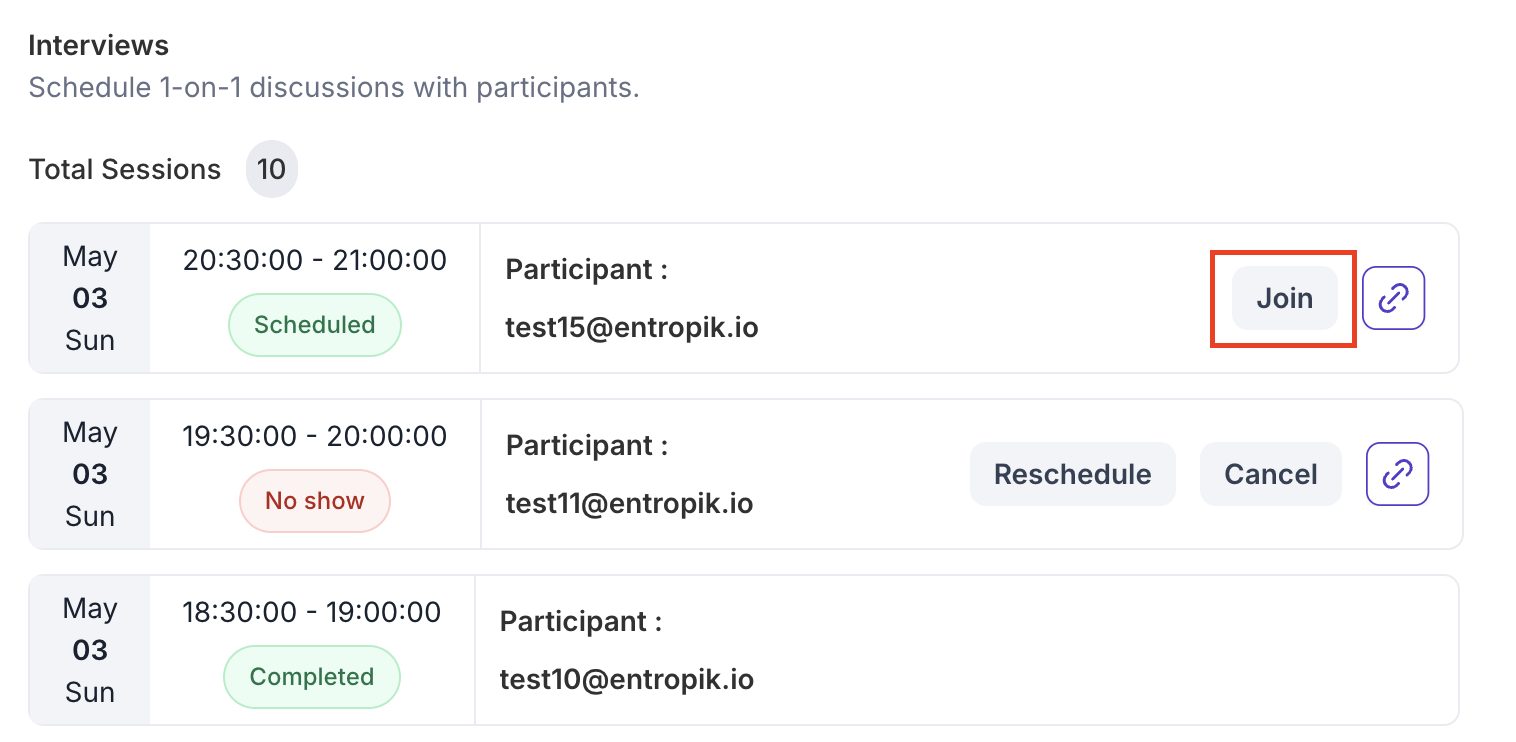
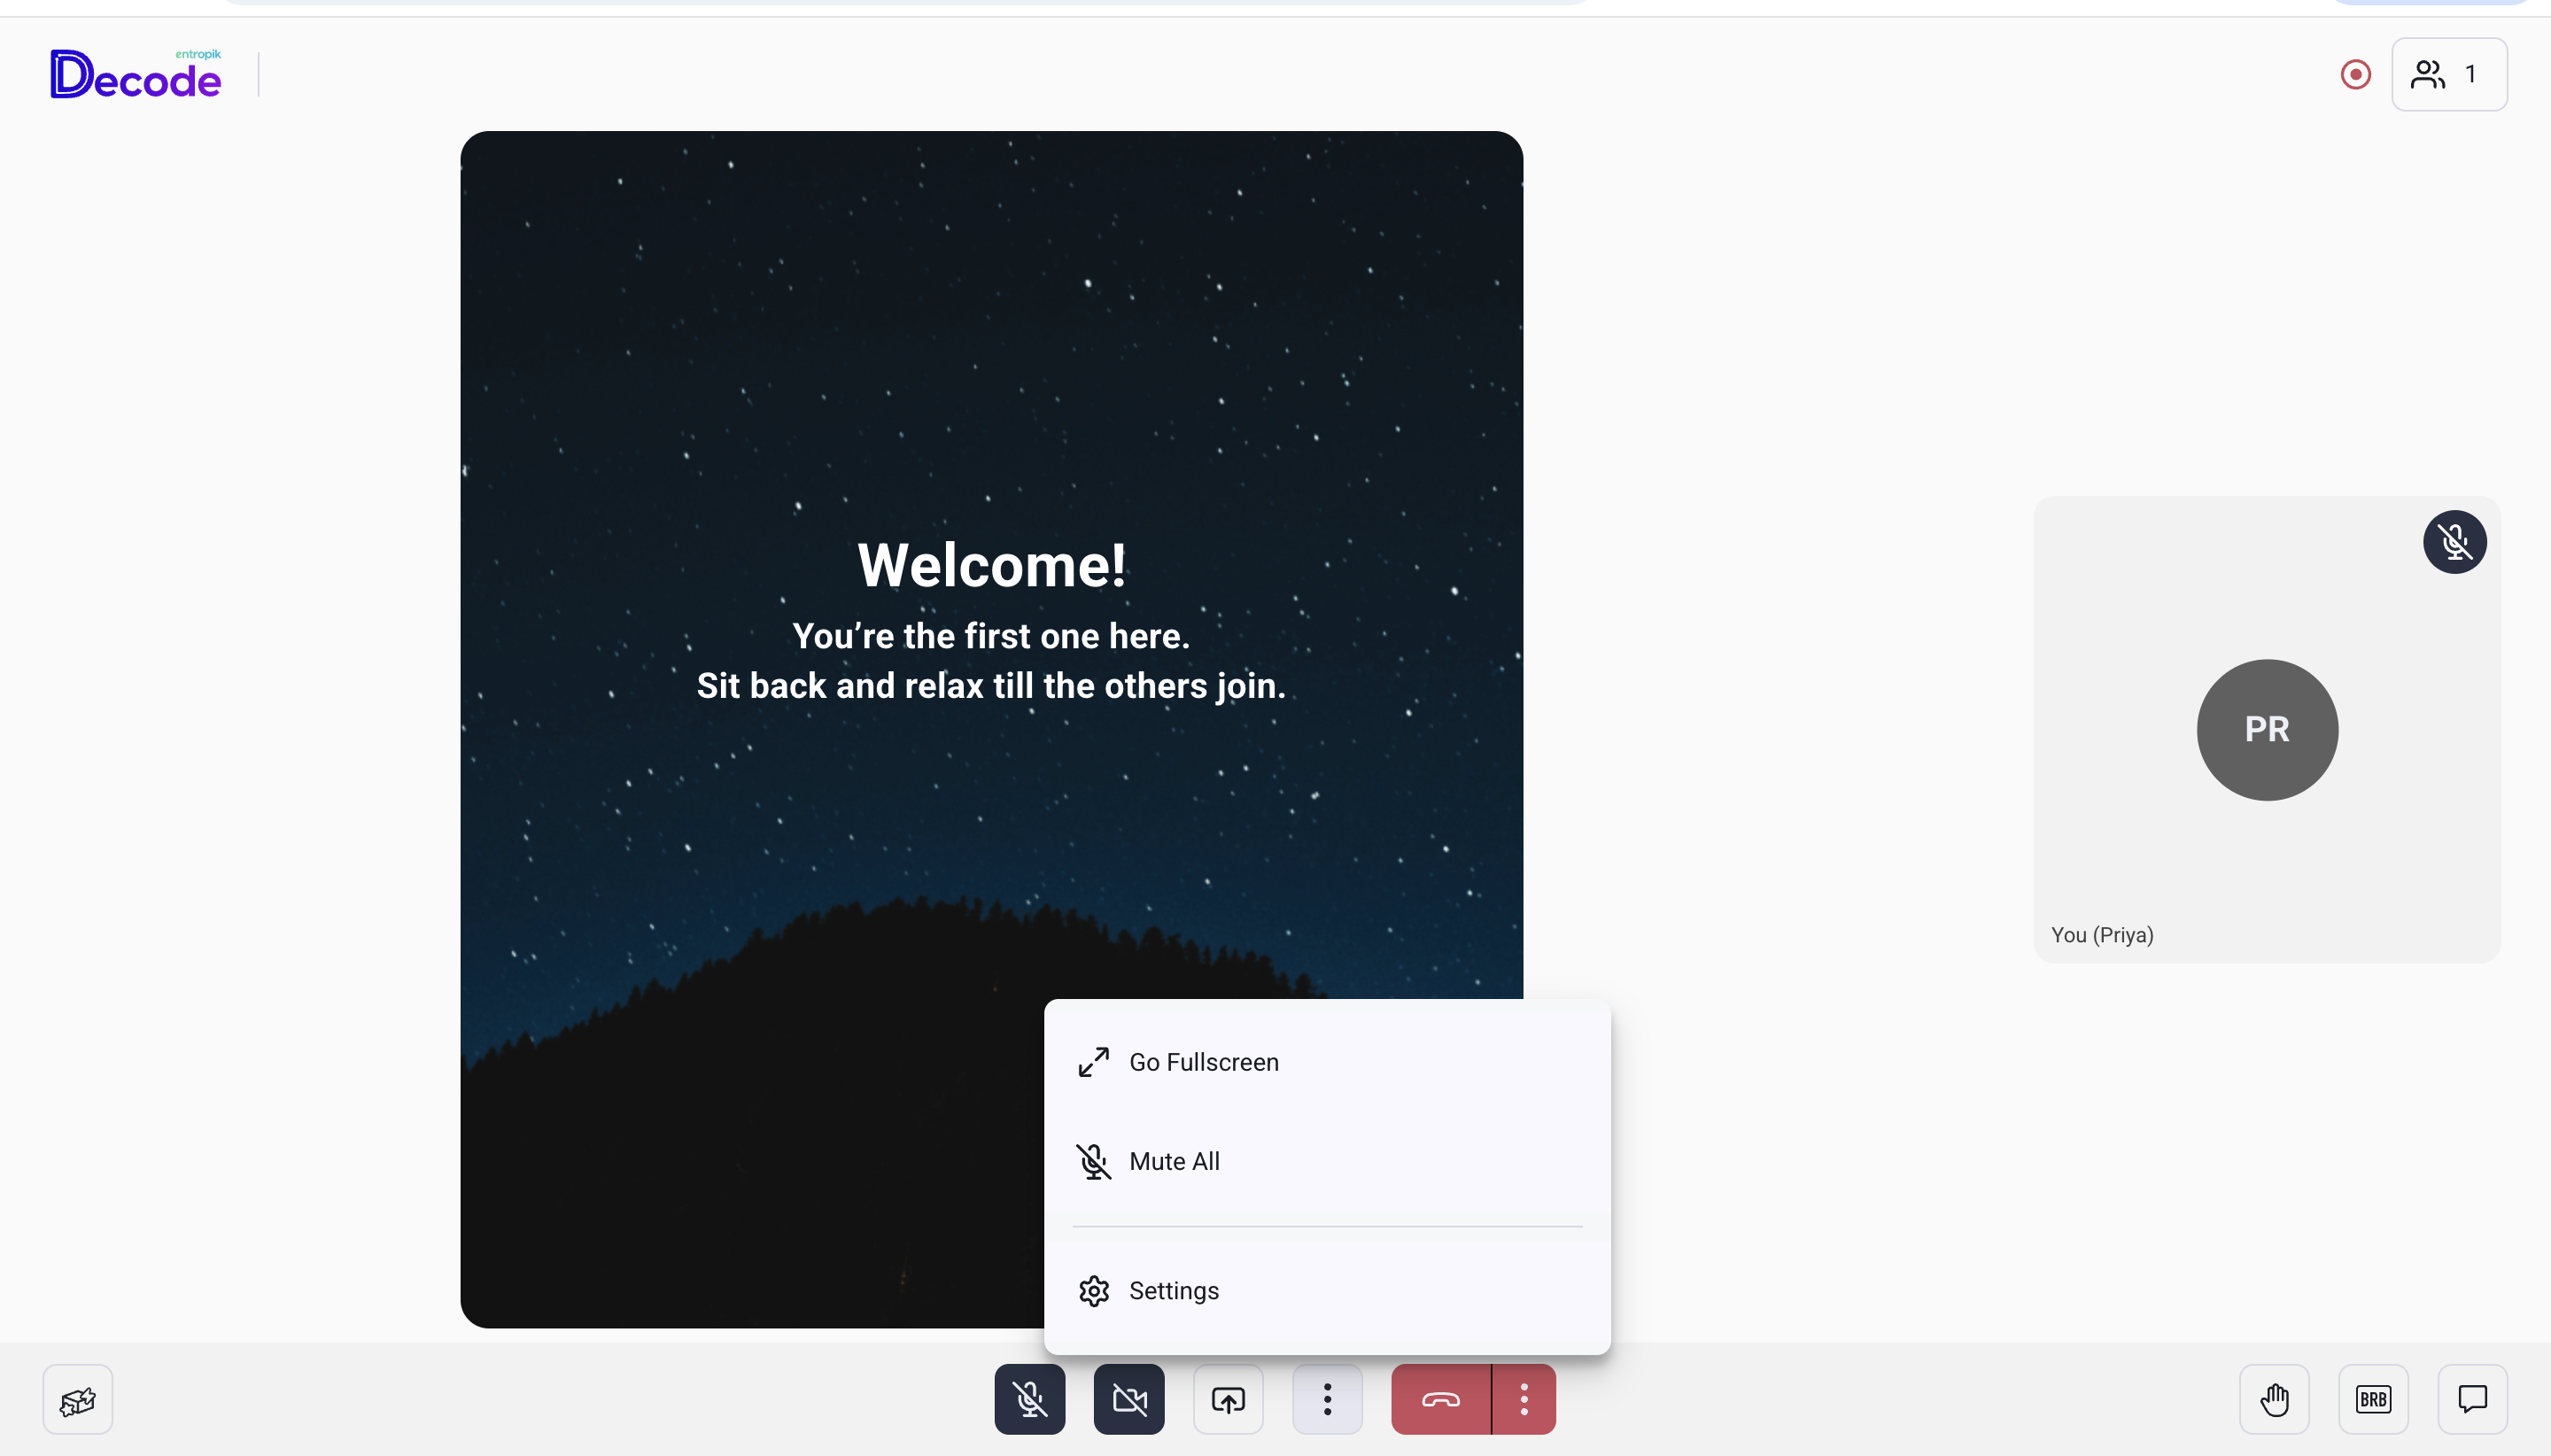
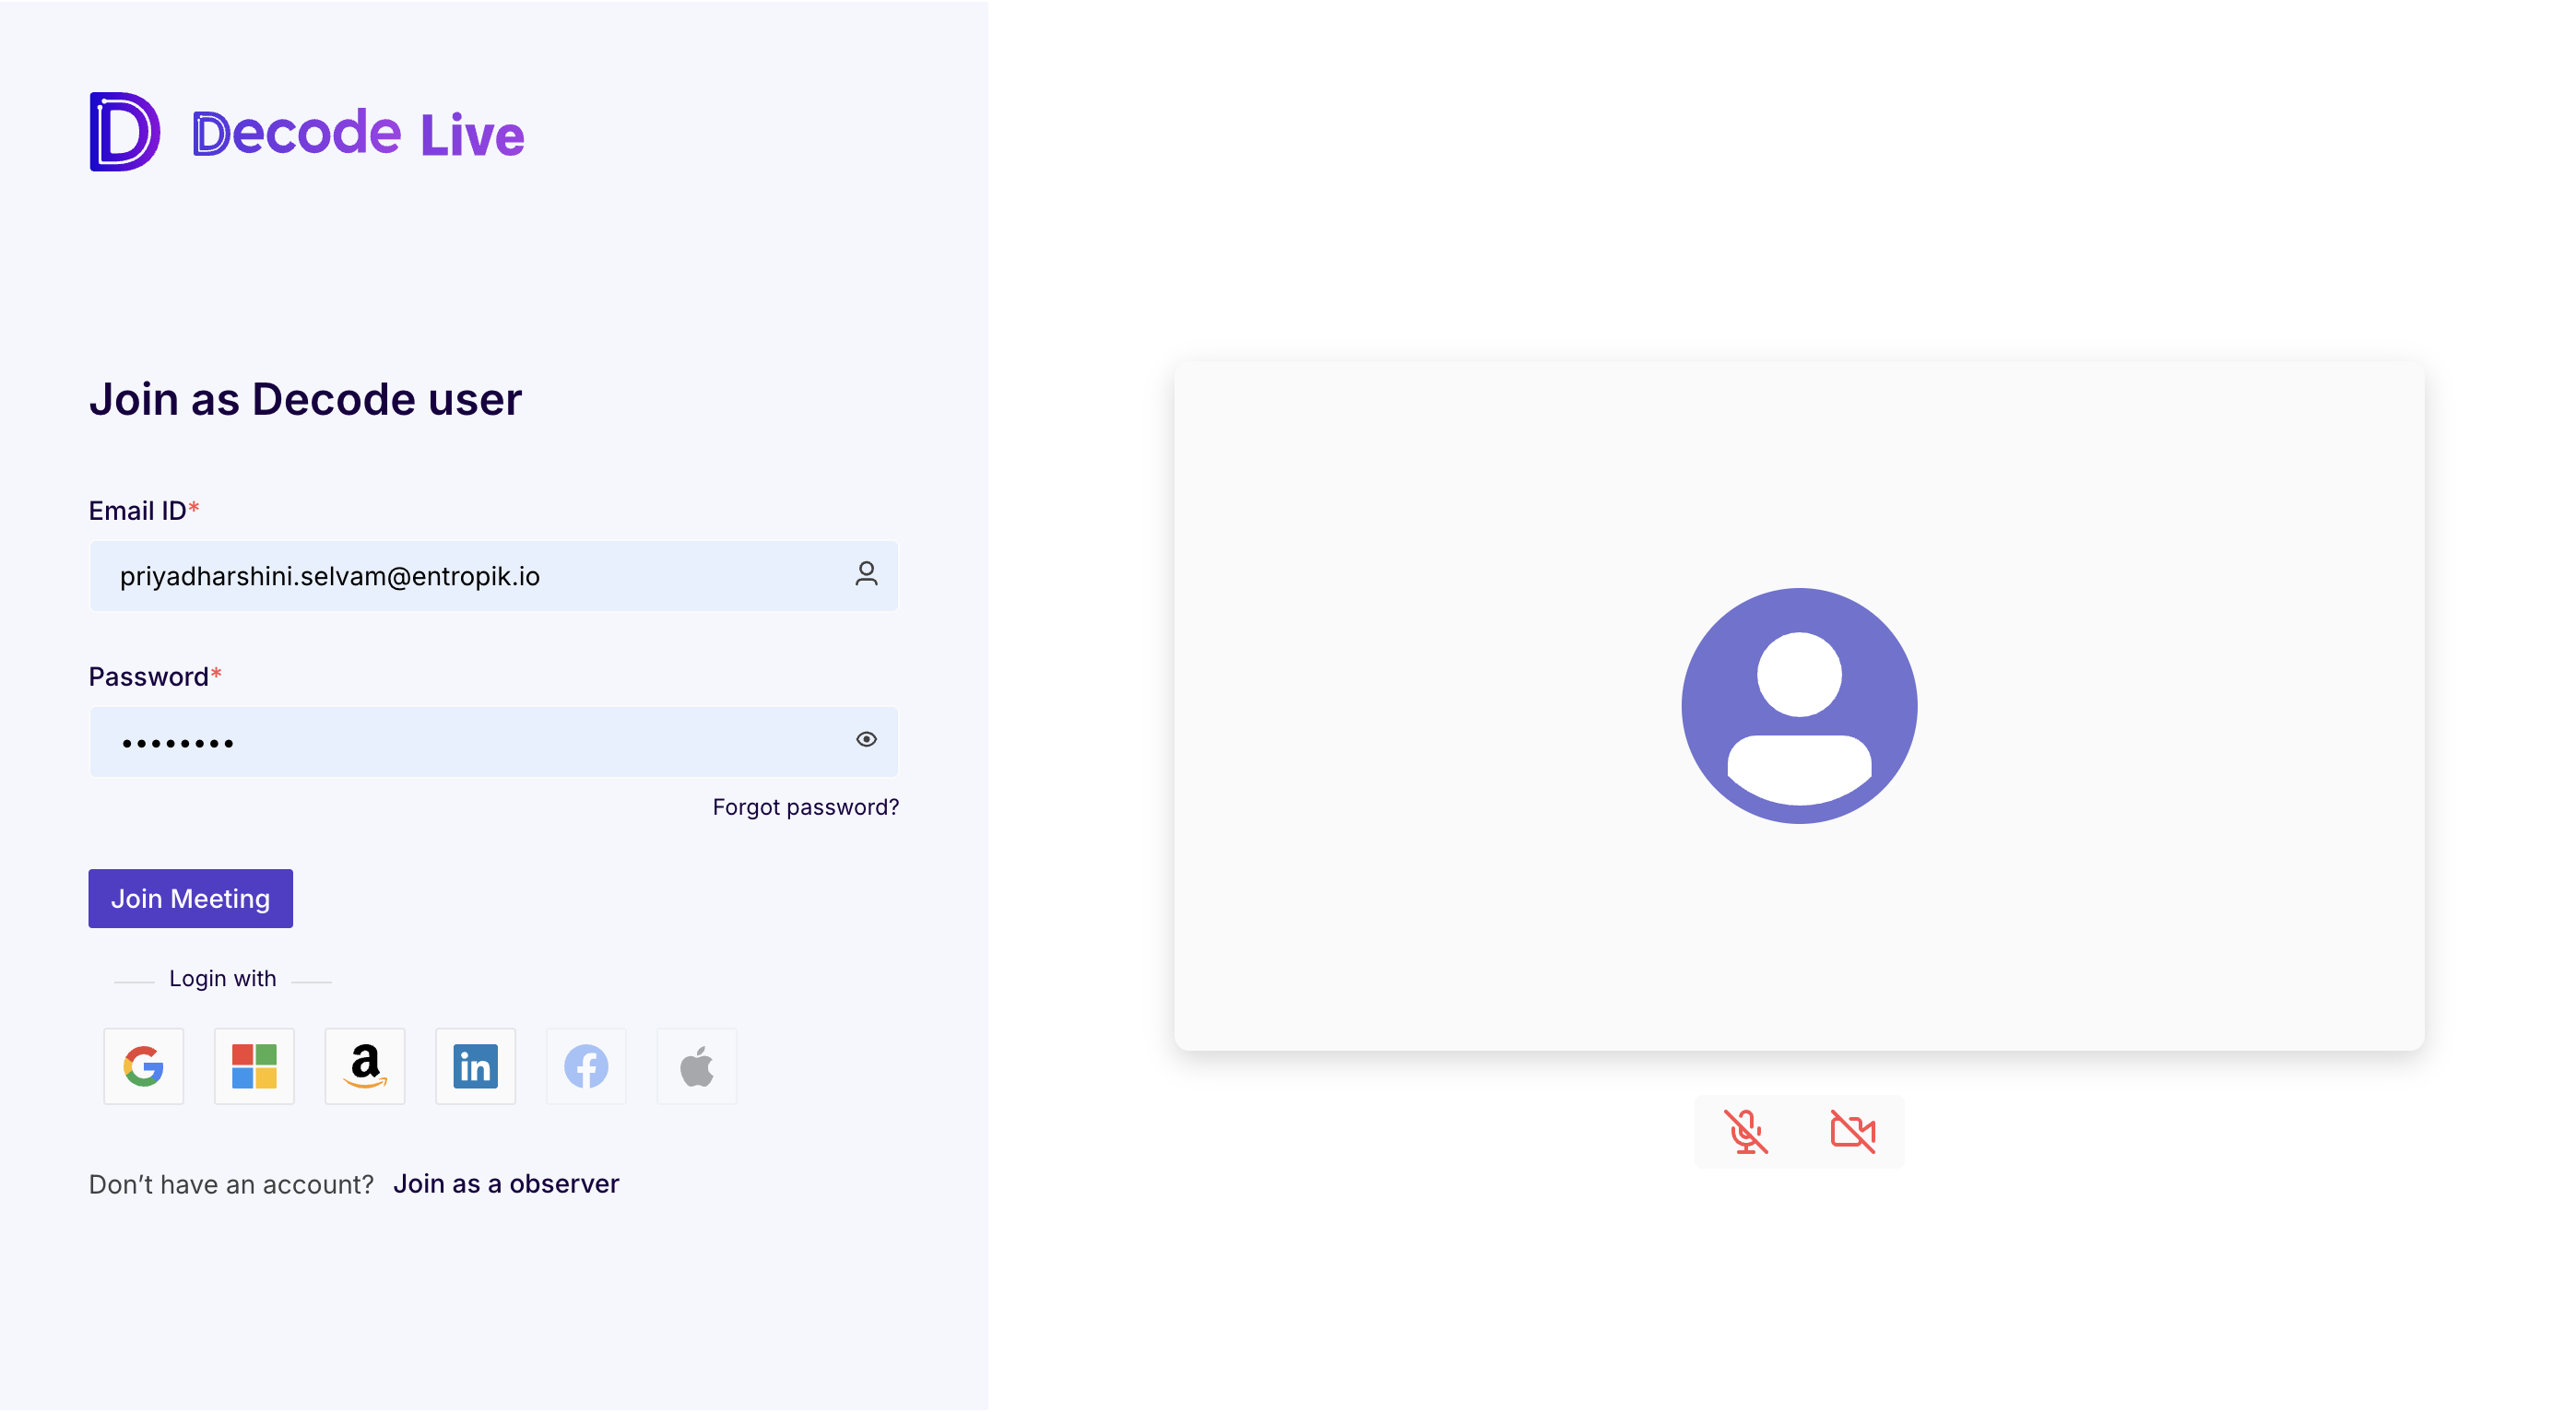
Open the moderator join link from your calendar invite, or go to the Sessions tab in Decode and click Join next to your session. On the Decode Live screen, you have thre ways to join.
1. Join as a moderator: Enter your Email ID and a Display Name, then click Join Meeting.
2. Join as a Decode user: If you have a Decode account, click Join as a Decode user and sign in with your email and password. You can also sign in using Google, Microsoft, Amazon, LinkedIn, Facebook, or Apple.

3. Join from the Sessions tab: Click Join next to your session in the Sessions tab in Decode. This opens the Decode Live screen with your email address already prefilled. Enter your Display Name and click Join Meeting.
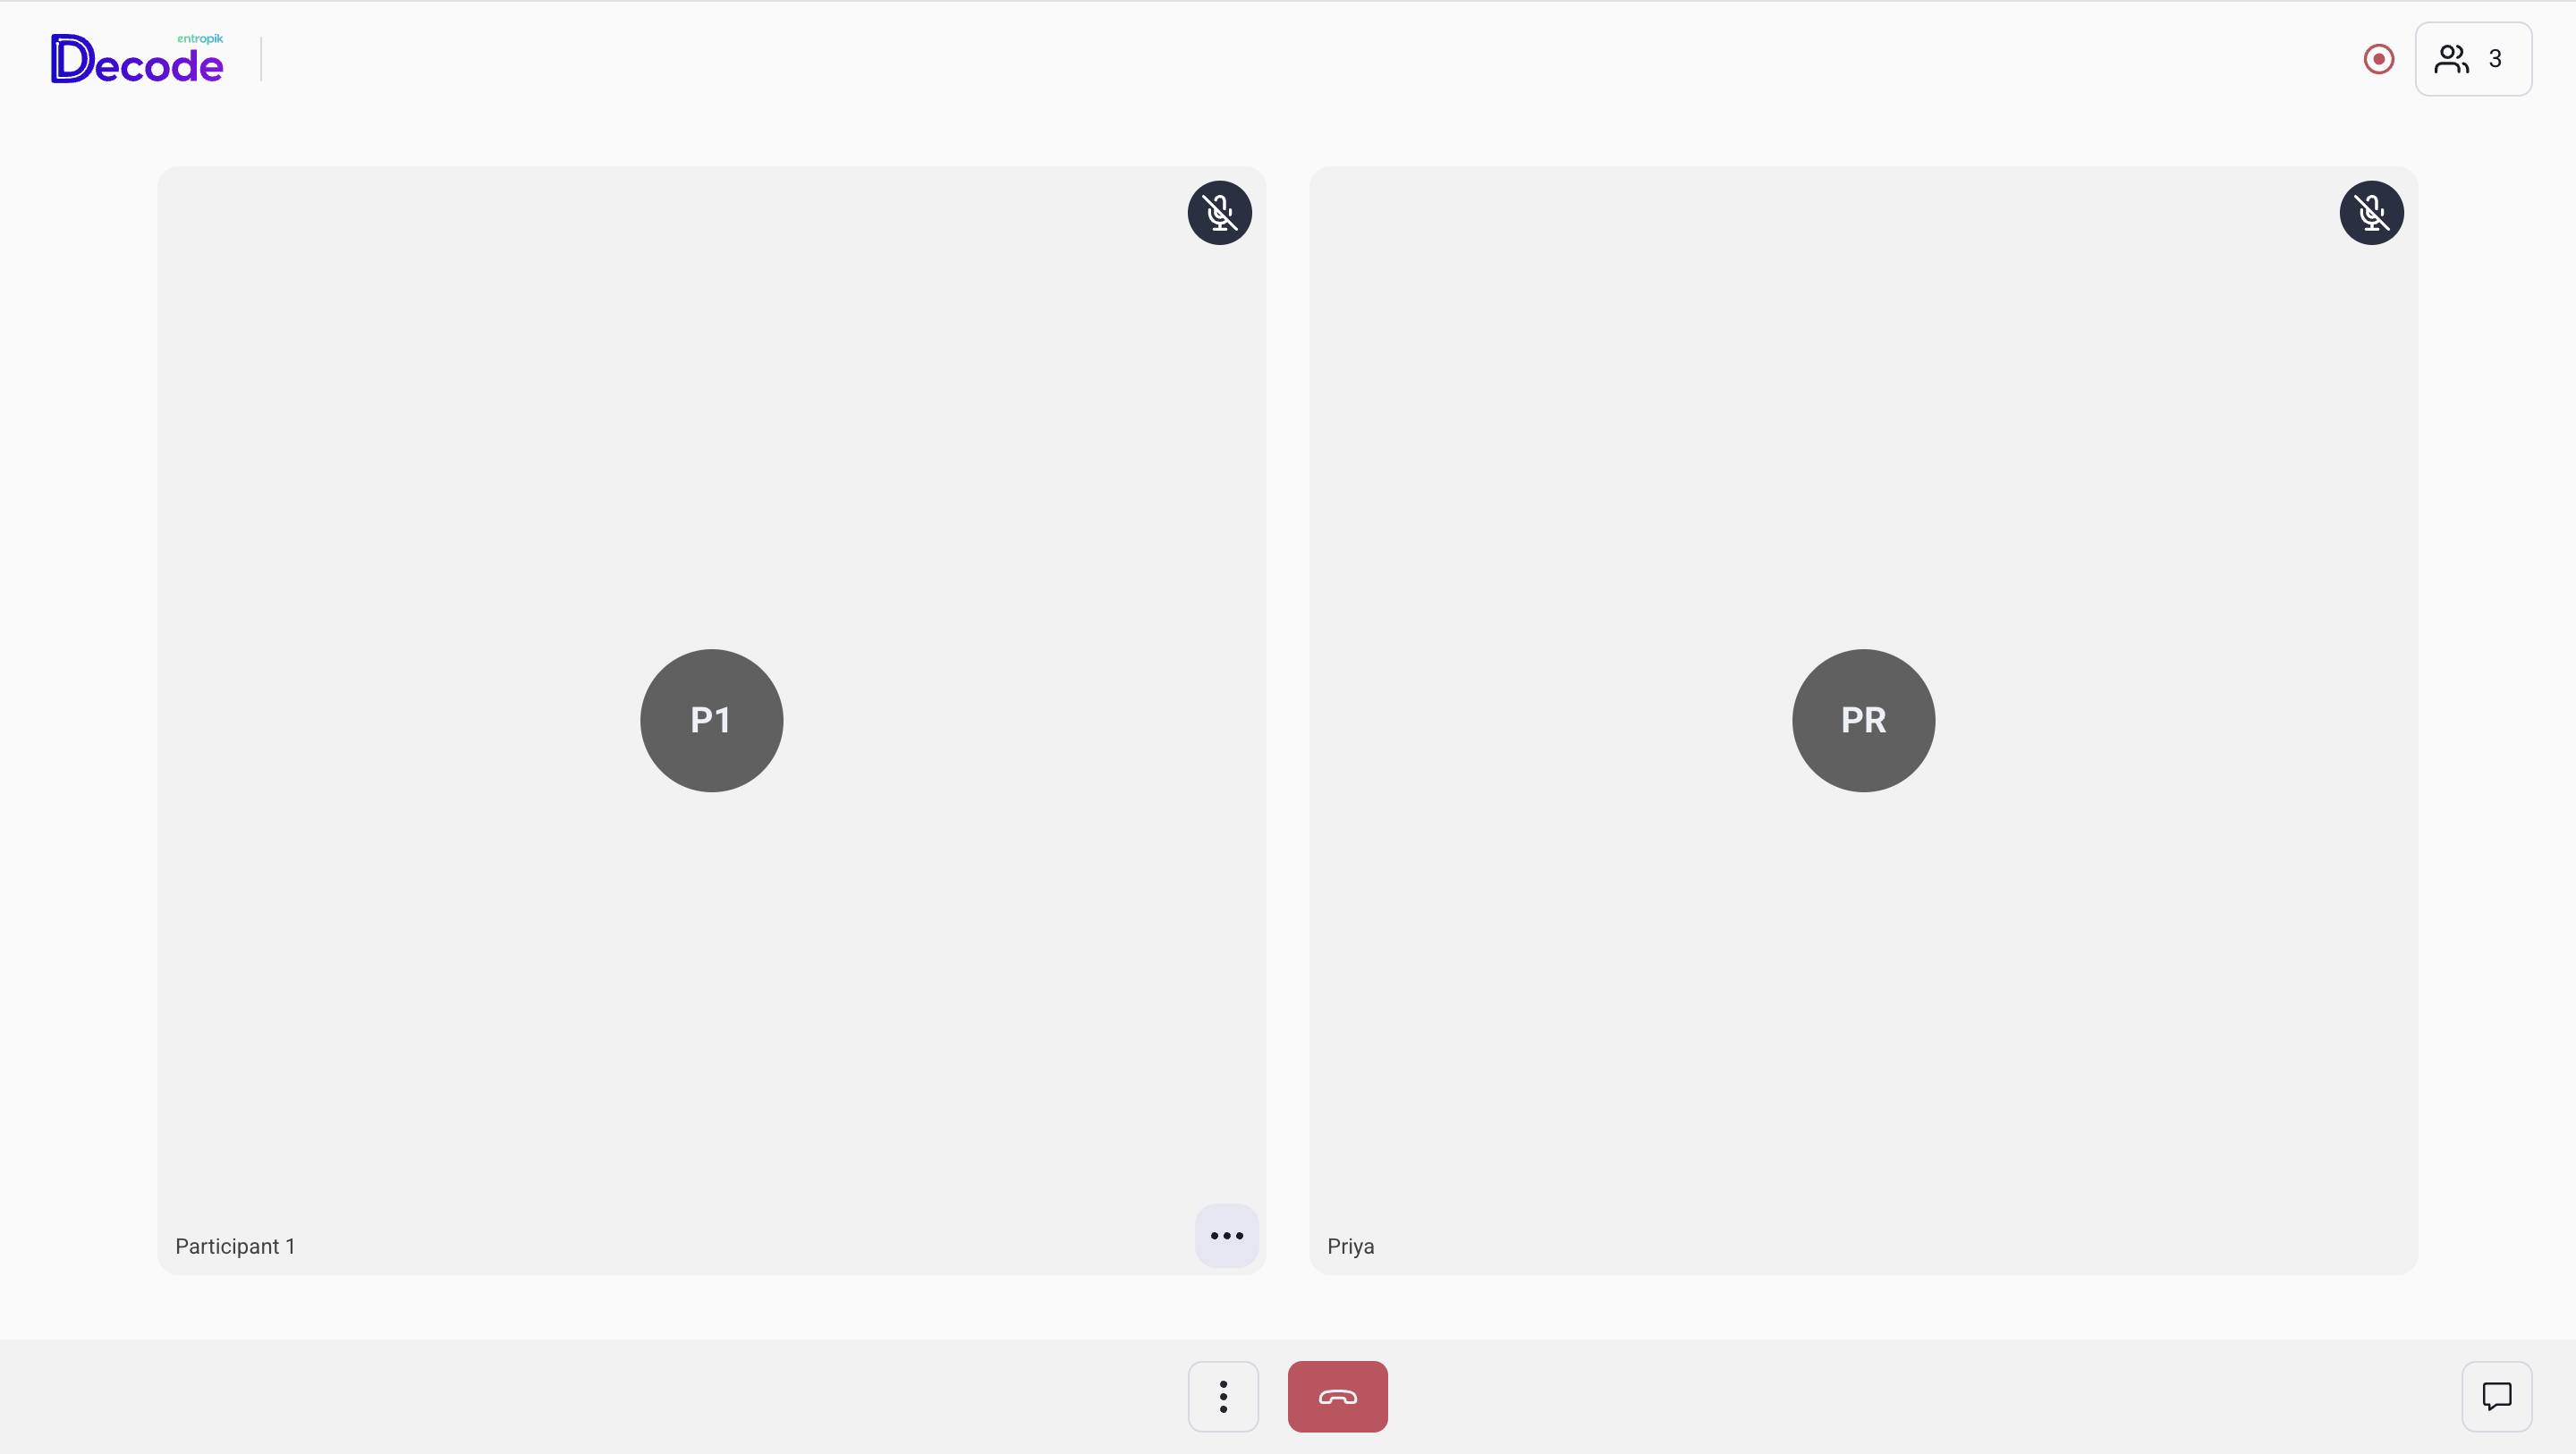
Once the participant joins and you admit them, their tile appears in the main view and the session begins.
Session Features
The following features are available to the moderator during a live session.
1. Microphone
Mute or unmute your audio during the session.
2. Camera
Turn your video on or off during the session.
3. Screen Share
Share your screen with everyone in the session. Use this when you want to show the participant a prototype, design, or any material they need to react to or interact with during the session.
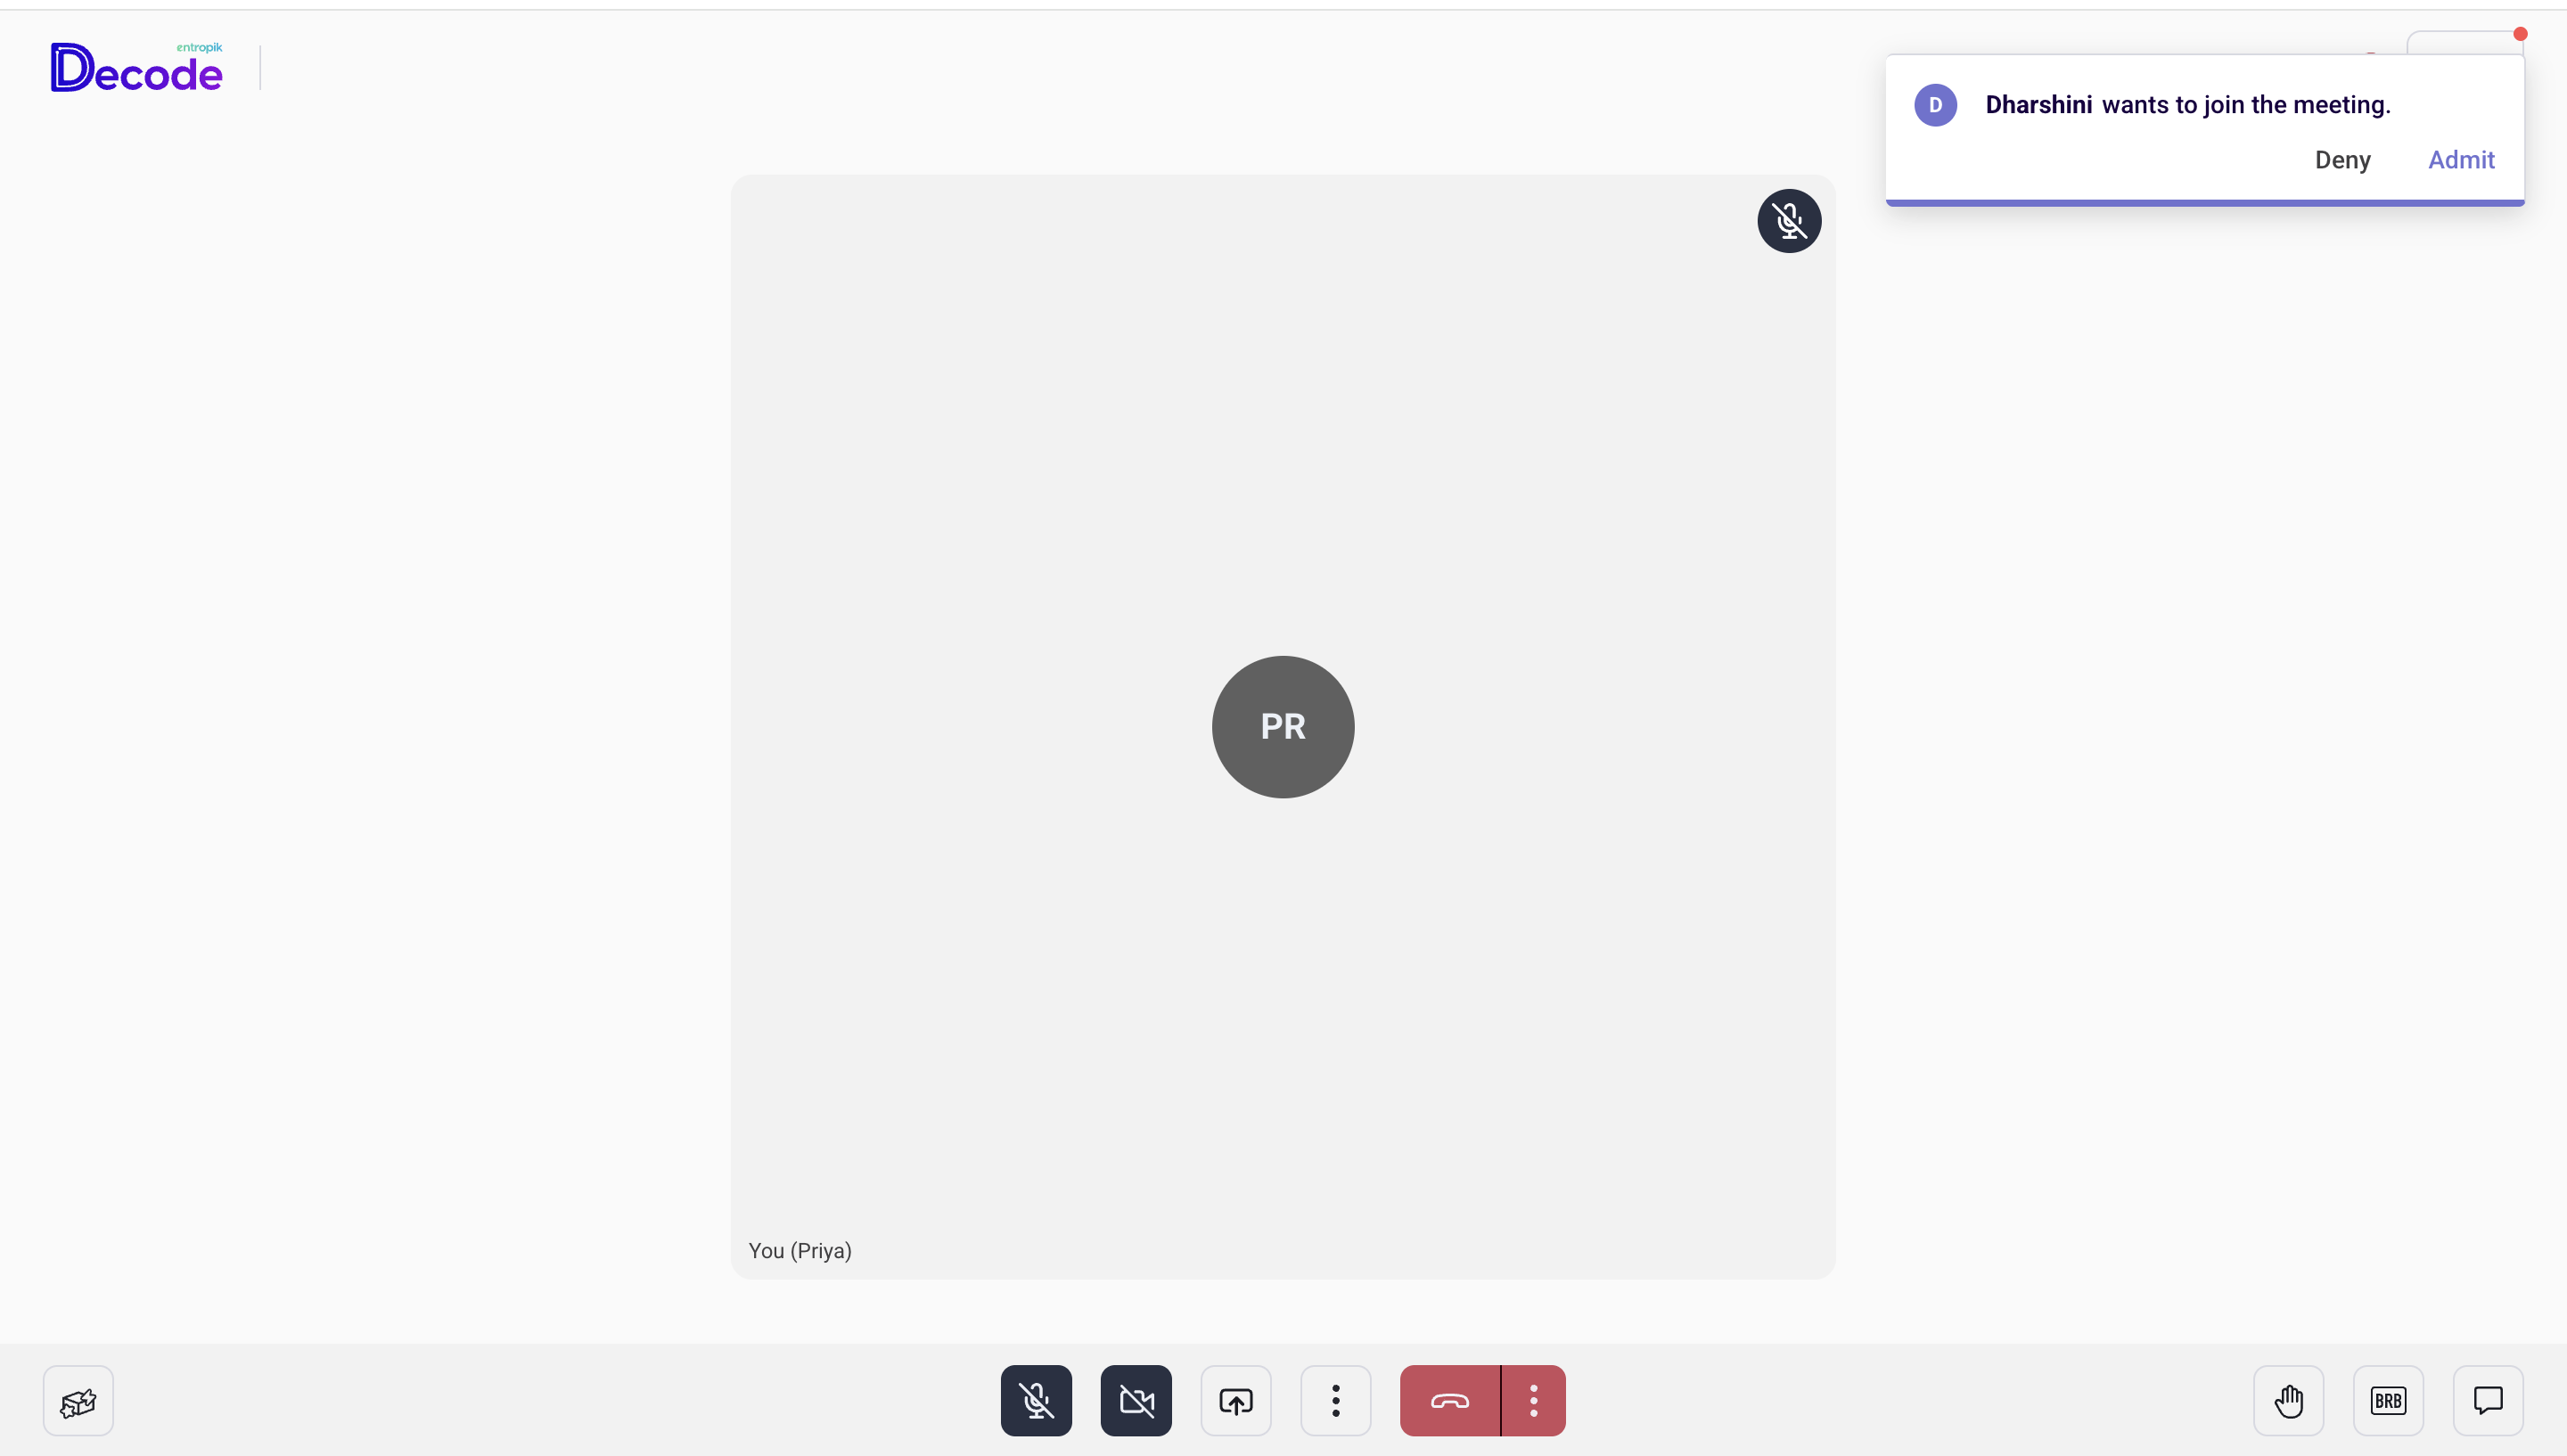
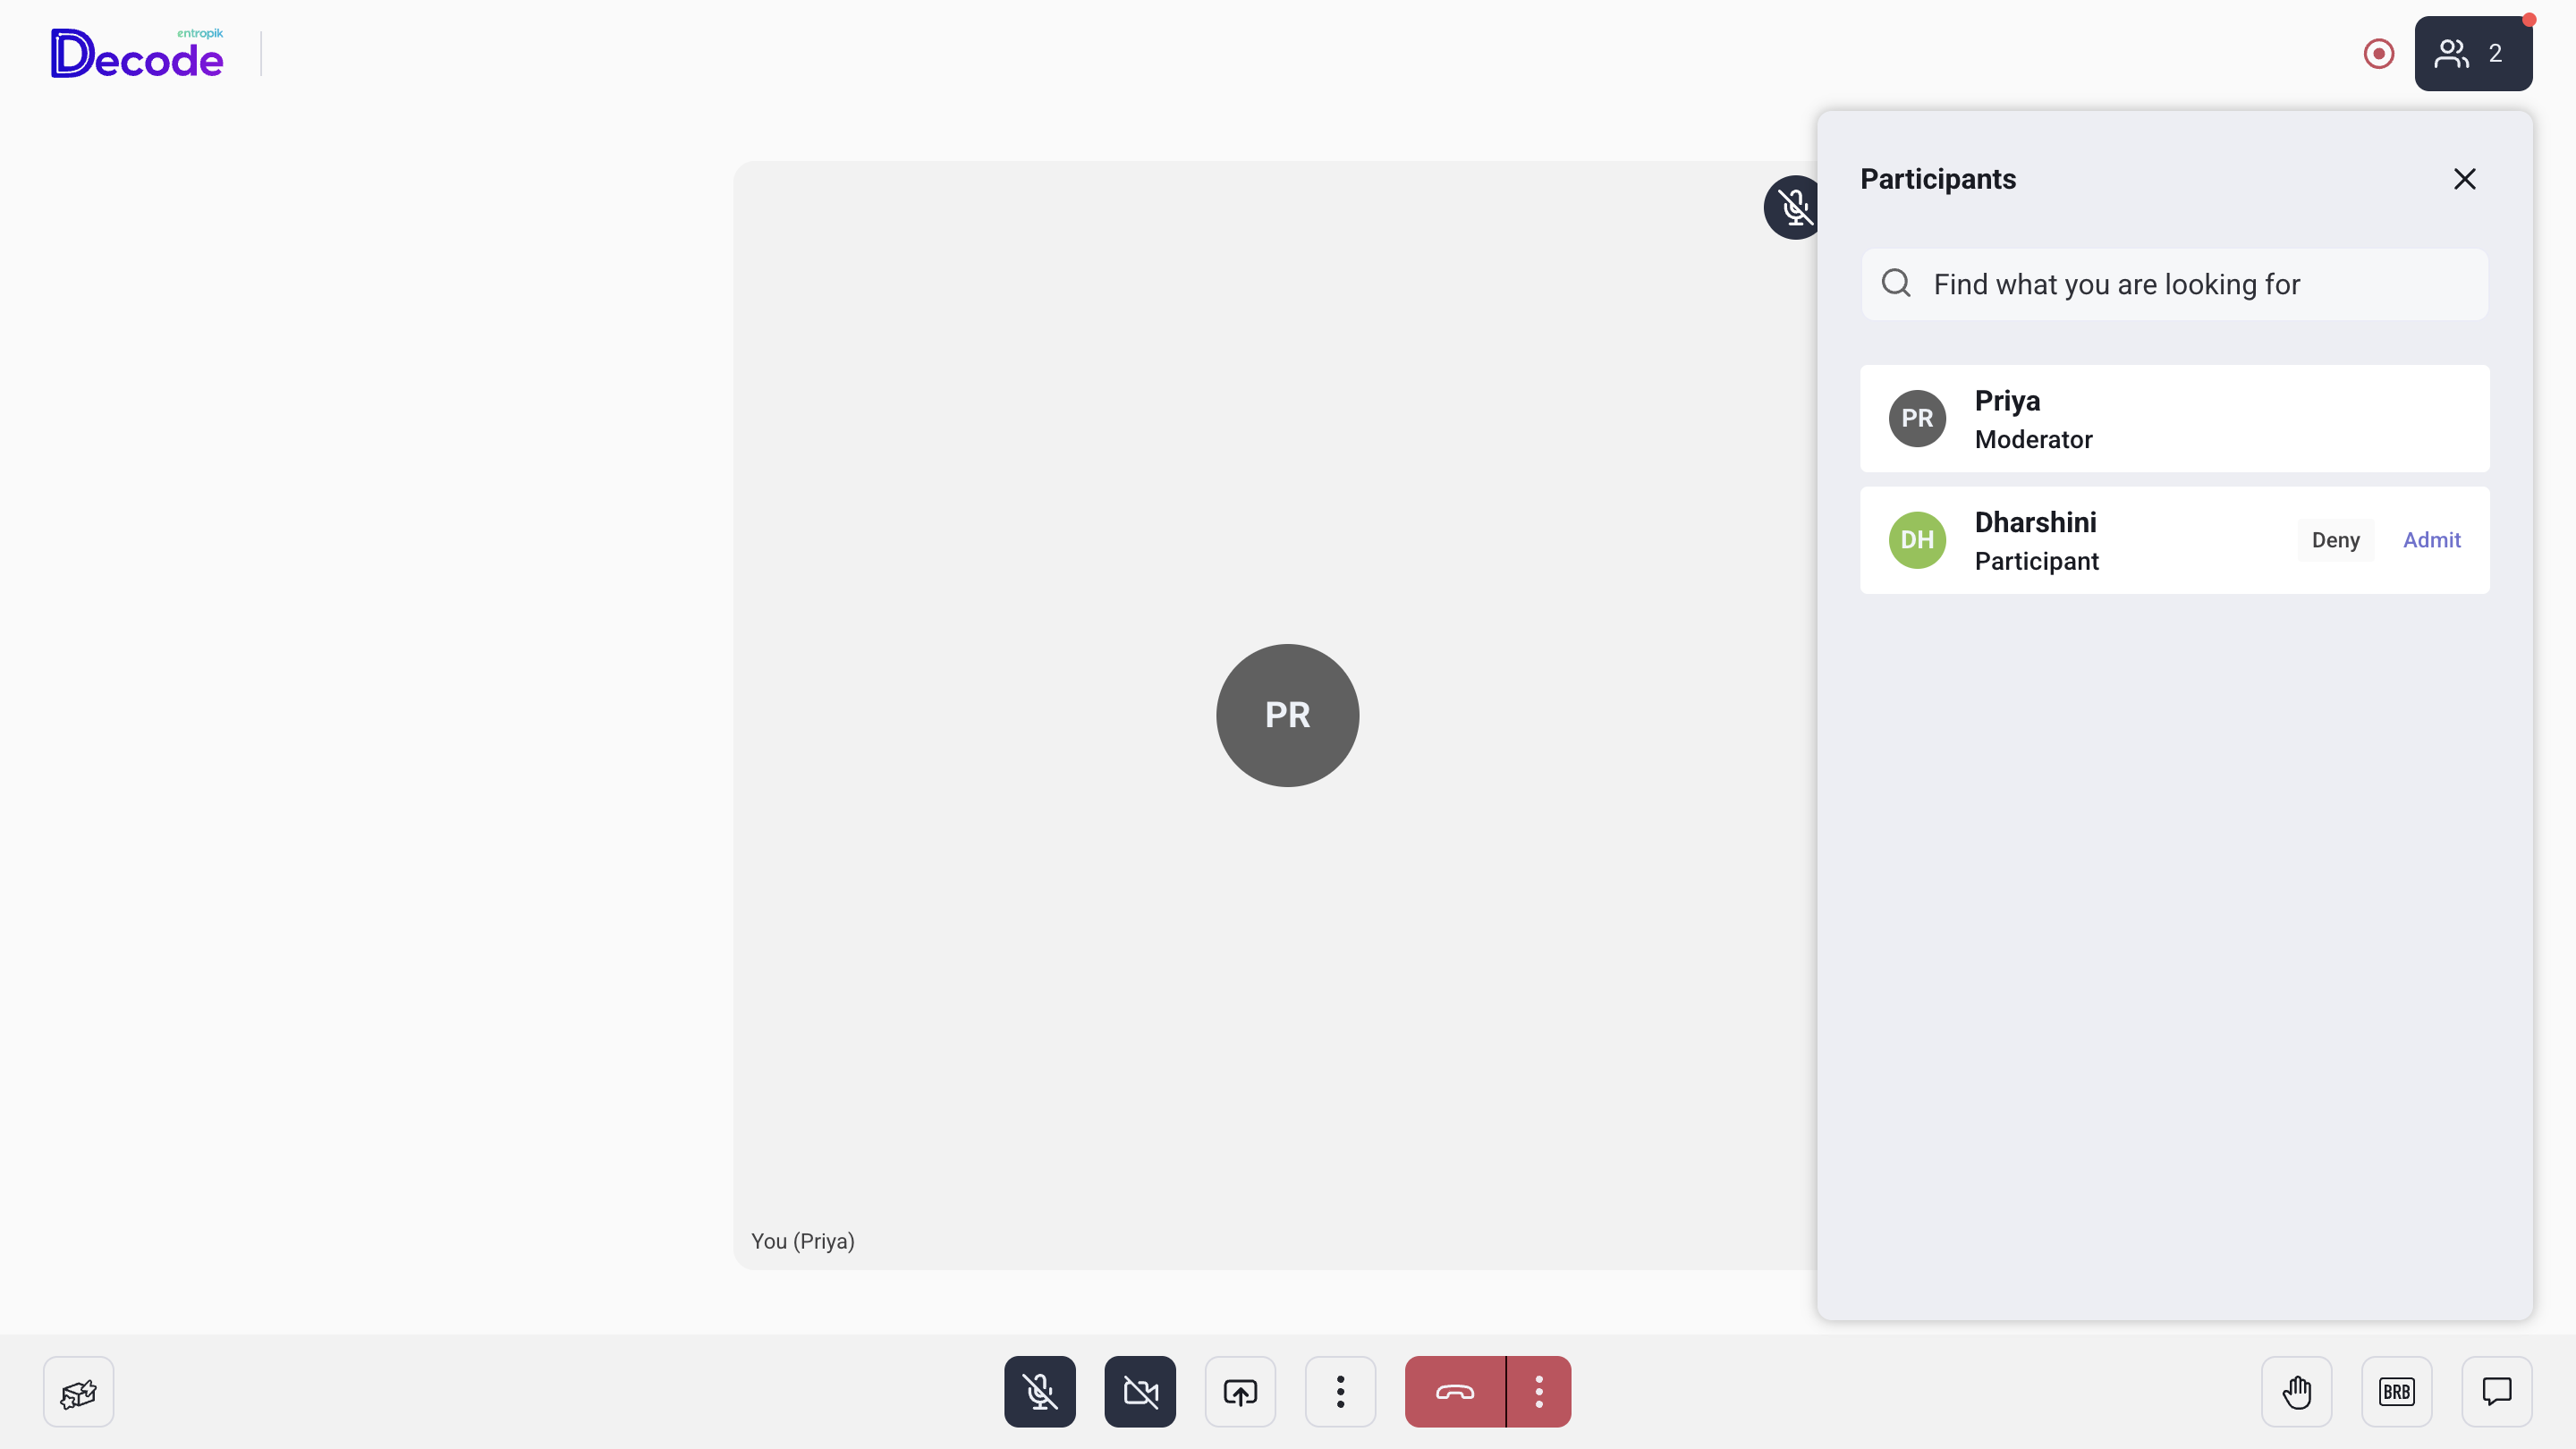
4. Admit and Deny
When a participant is waiting to join, a notification appears in the top right with their name and Admit and Deny buttons. You can also open the Participants panel to manage this. Use Admit to let the participant in when you are ready to start. Use Deny if the wrong person has joined or if you are not ready.
5. Mute All
Mutes all participants in the session at once. Access this from the More Options menu. Use this when multiple participants are in the session and background noise is affecting the recording or making it difficult to hear clearly.
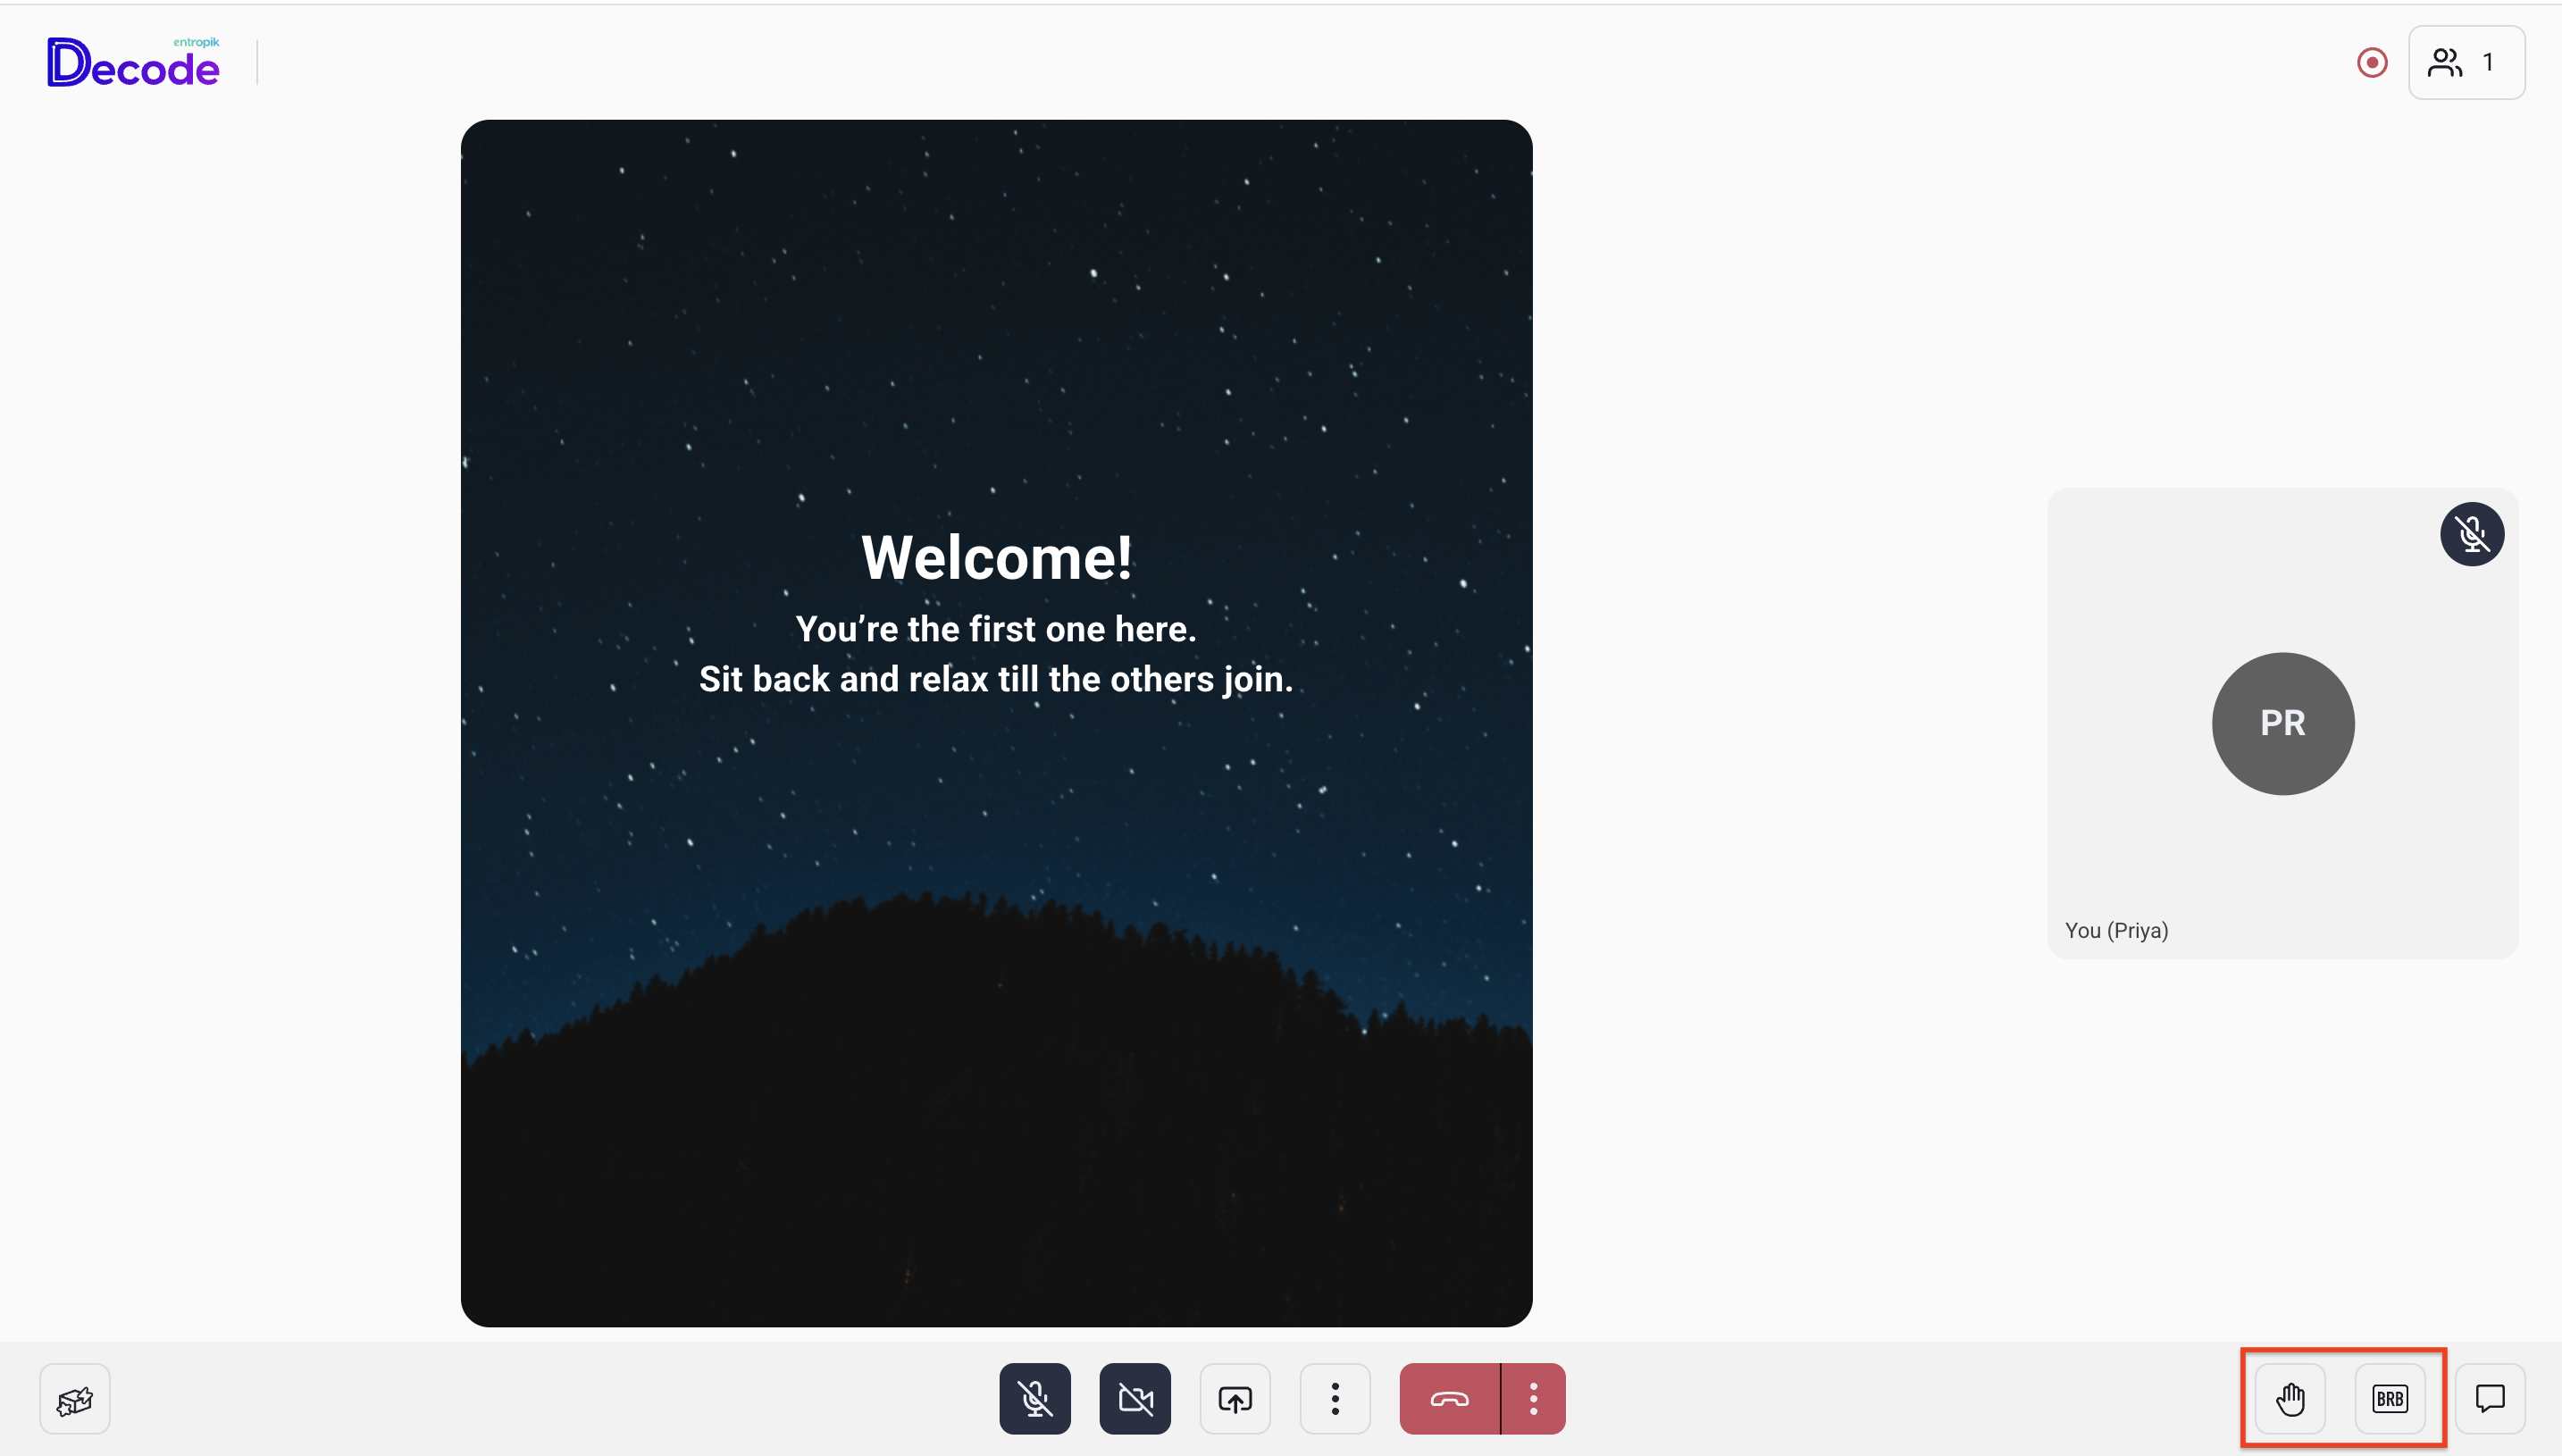
6. Hand Raise
Raises a hand signal visible to others in the session. As a moderator, use this to signal to the participant that you want to speak without interrupting them mid-sentence.
7. BRB (Be Right Back)
Marks you as temporarily away. Your tile shows a Be Right Back status to everyone in the session.
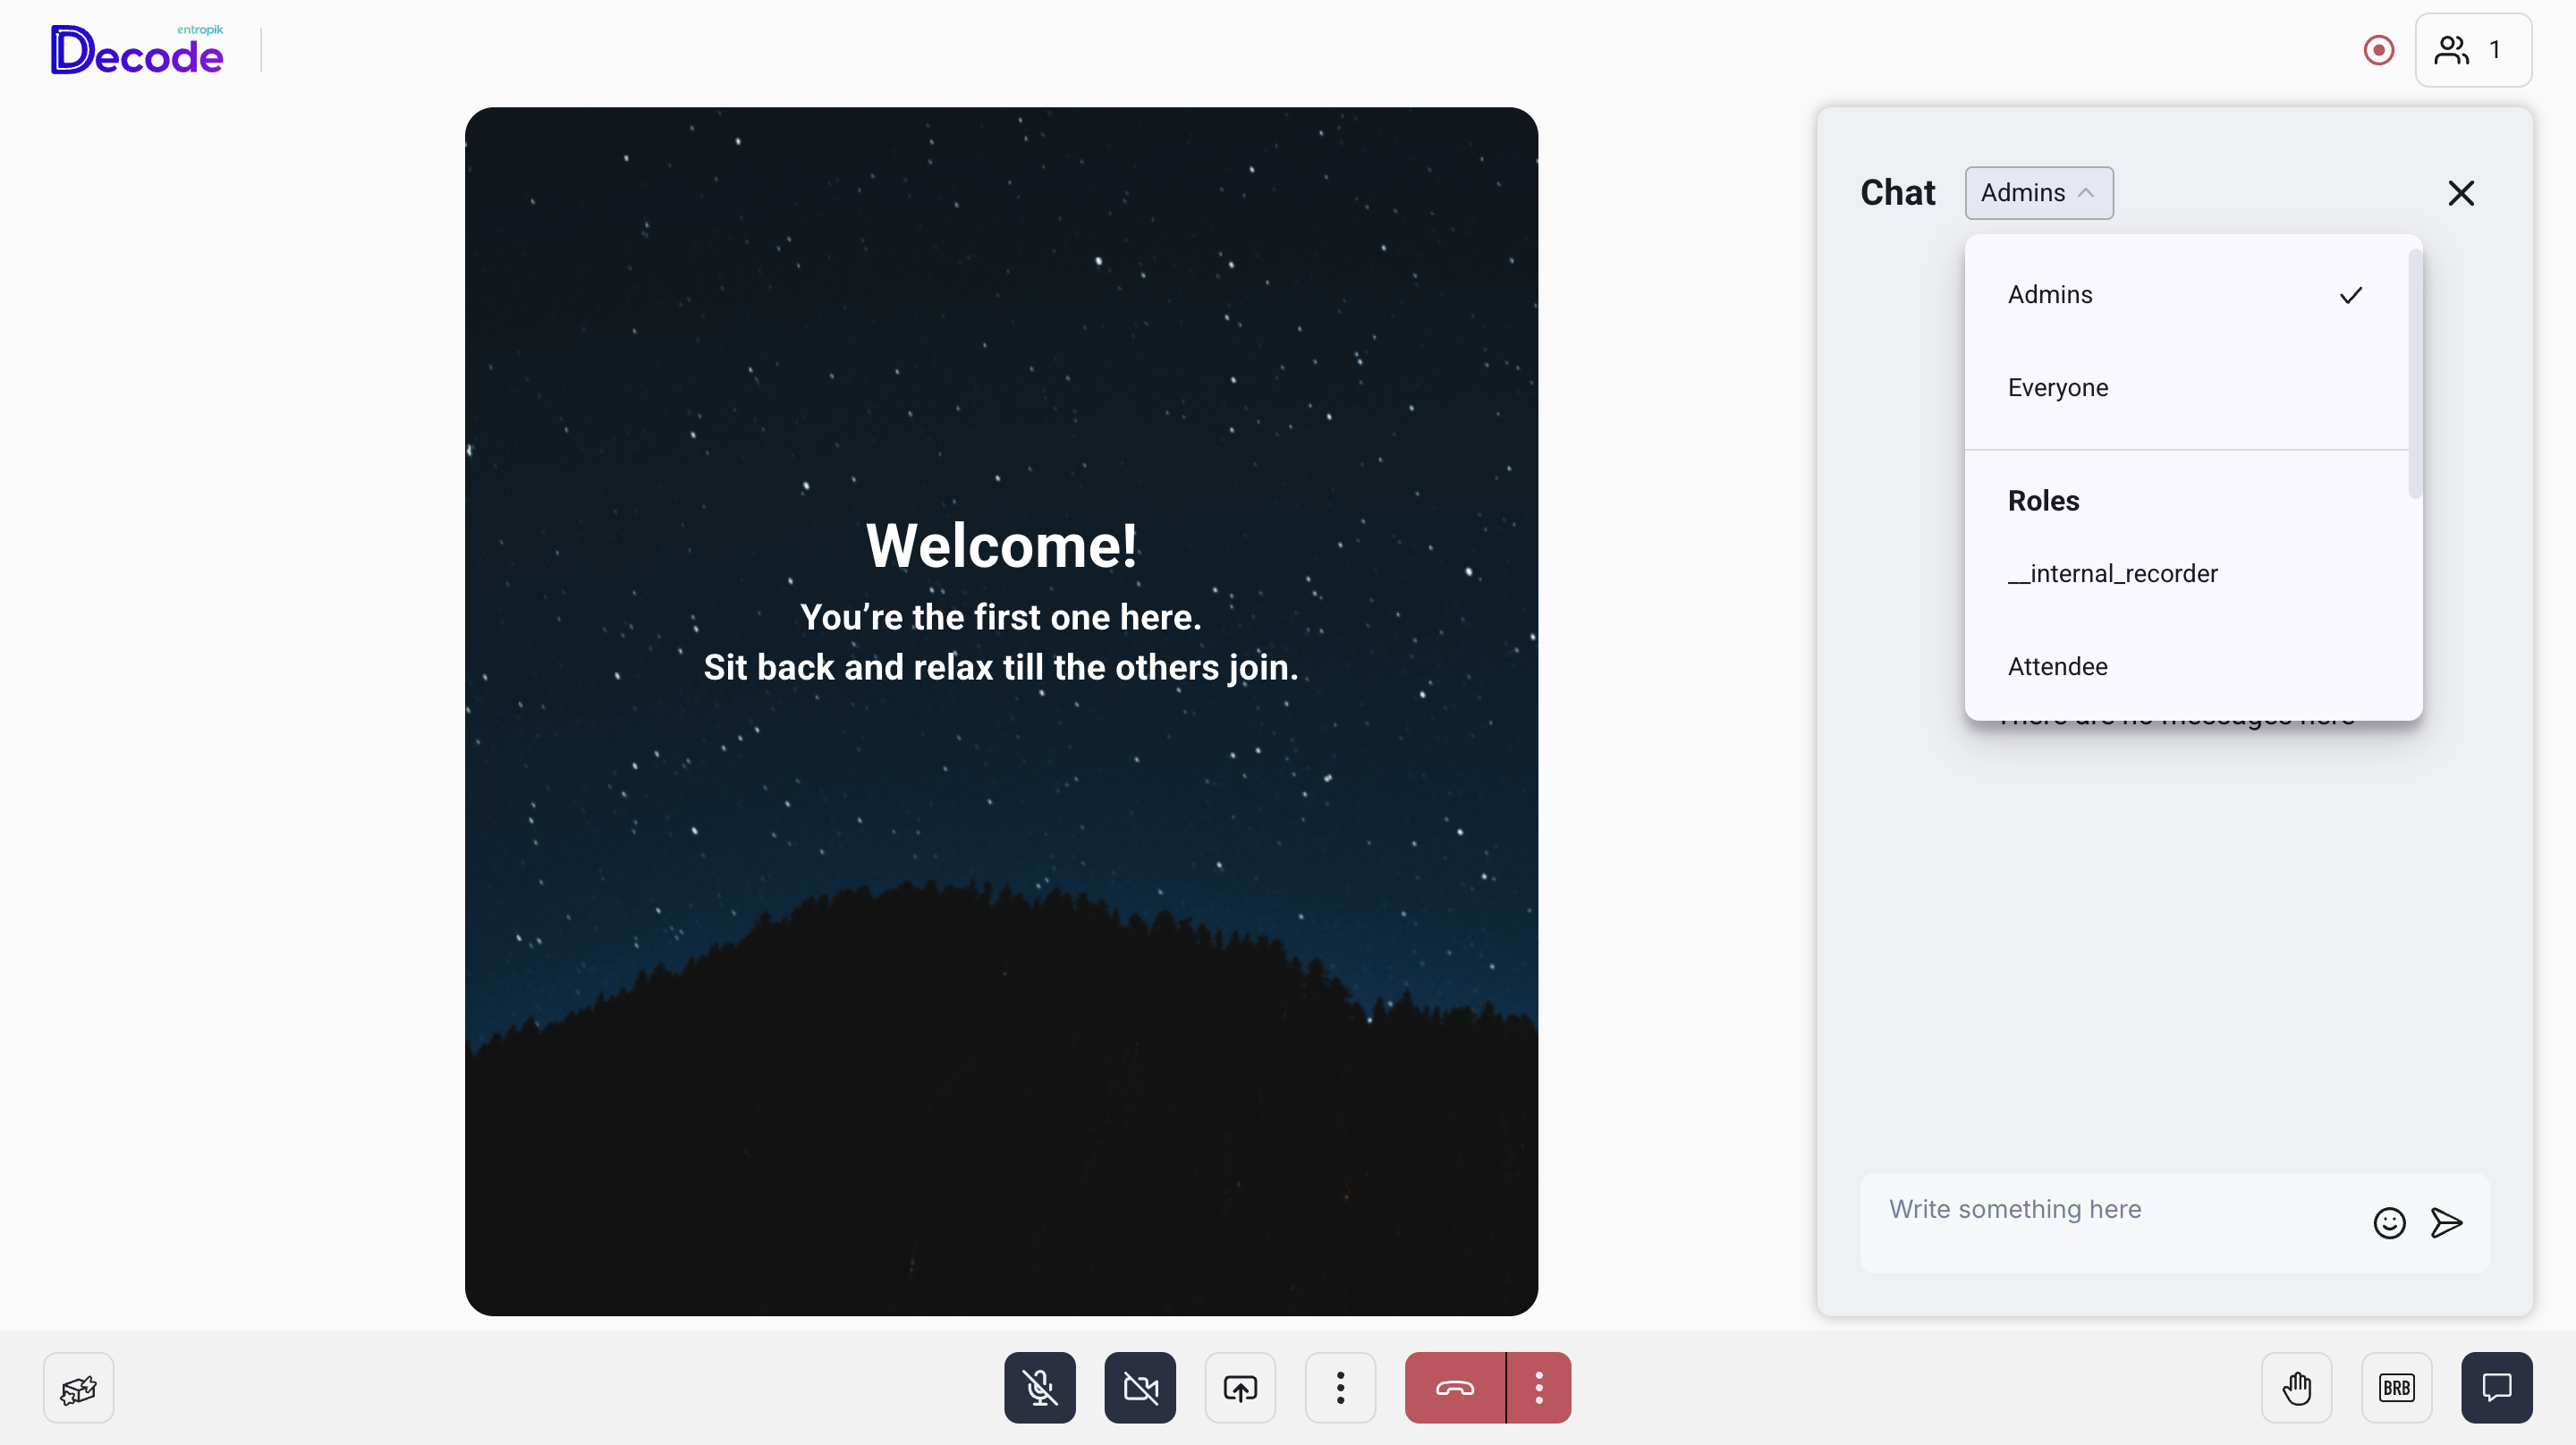
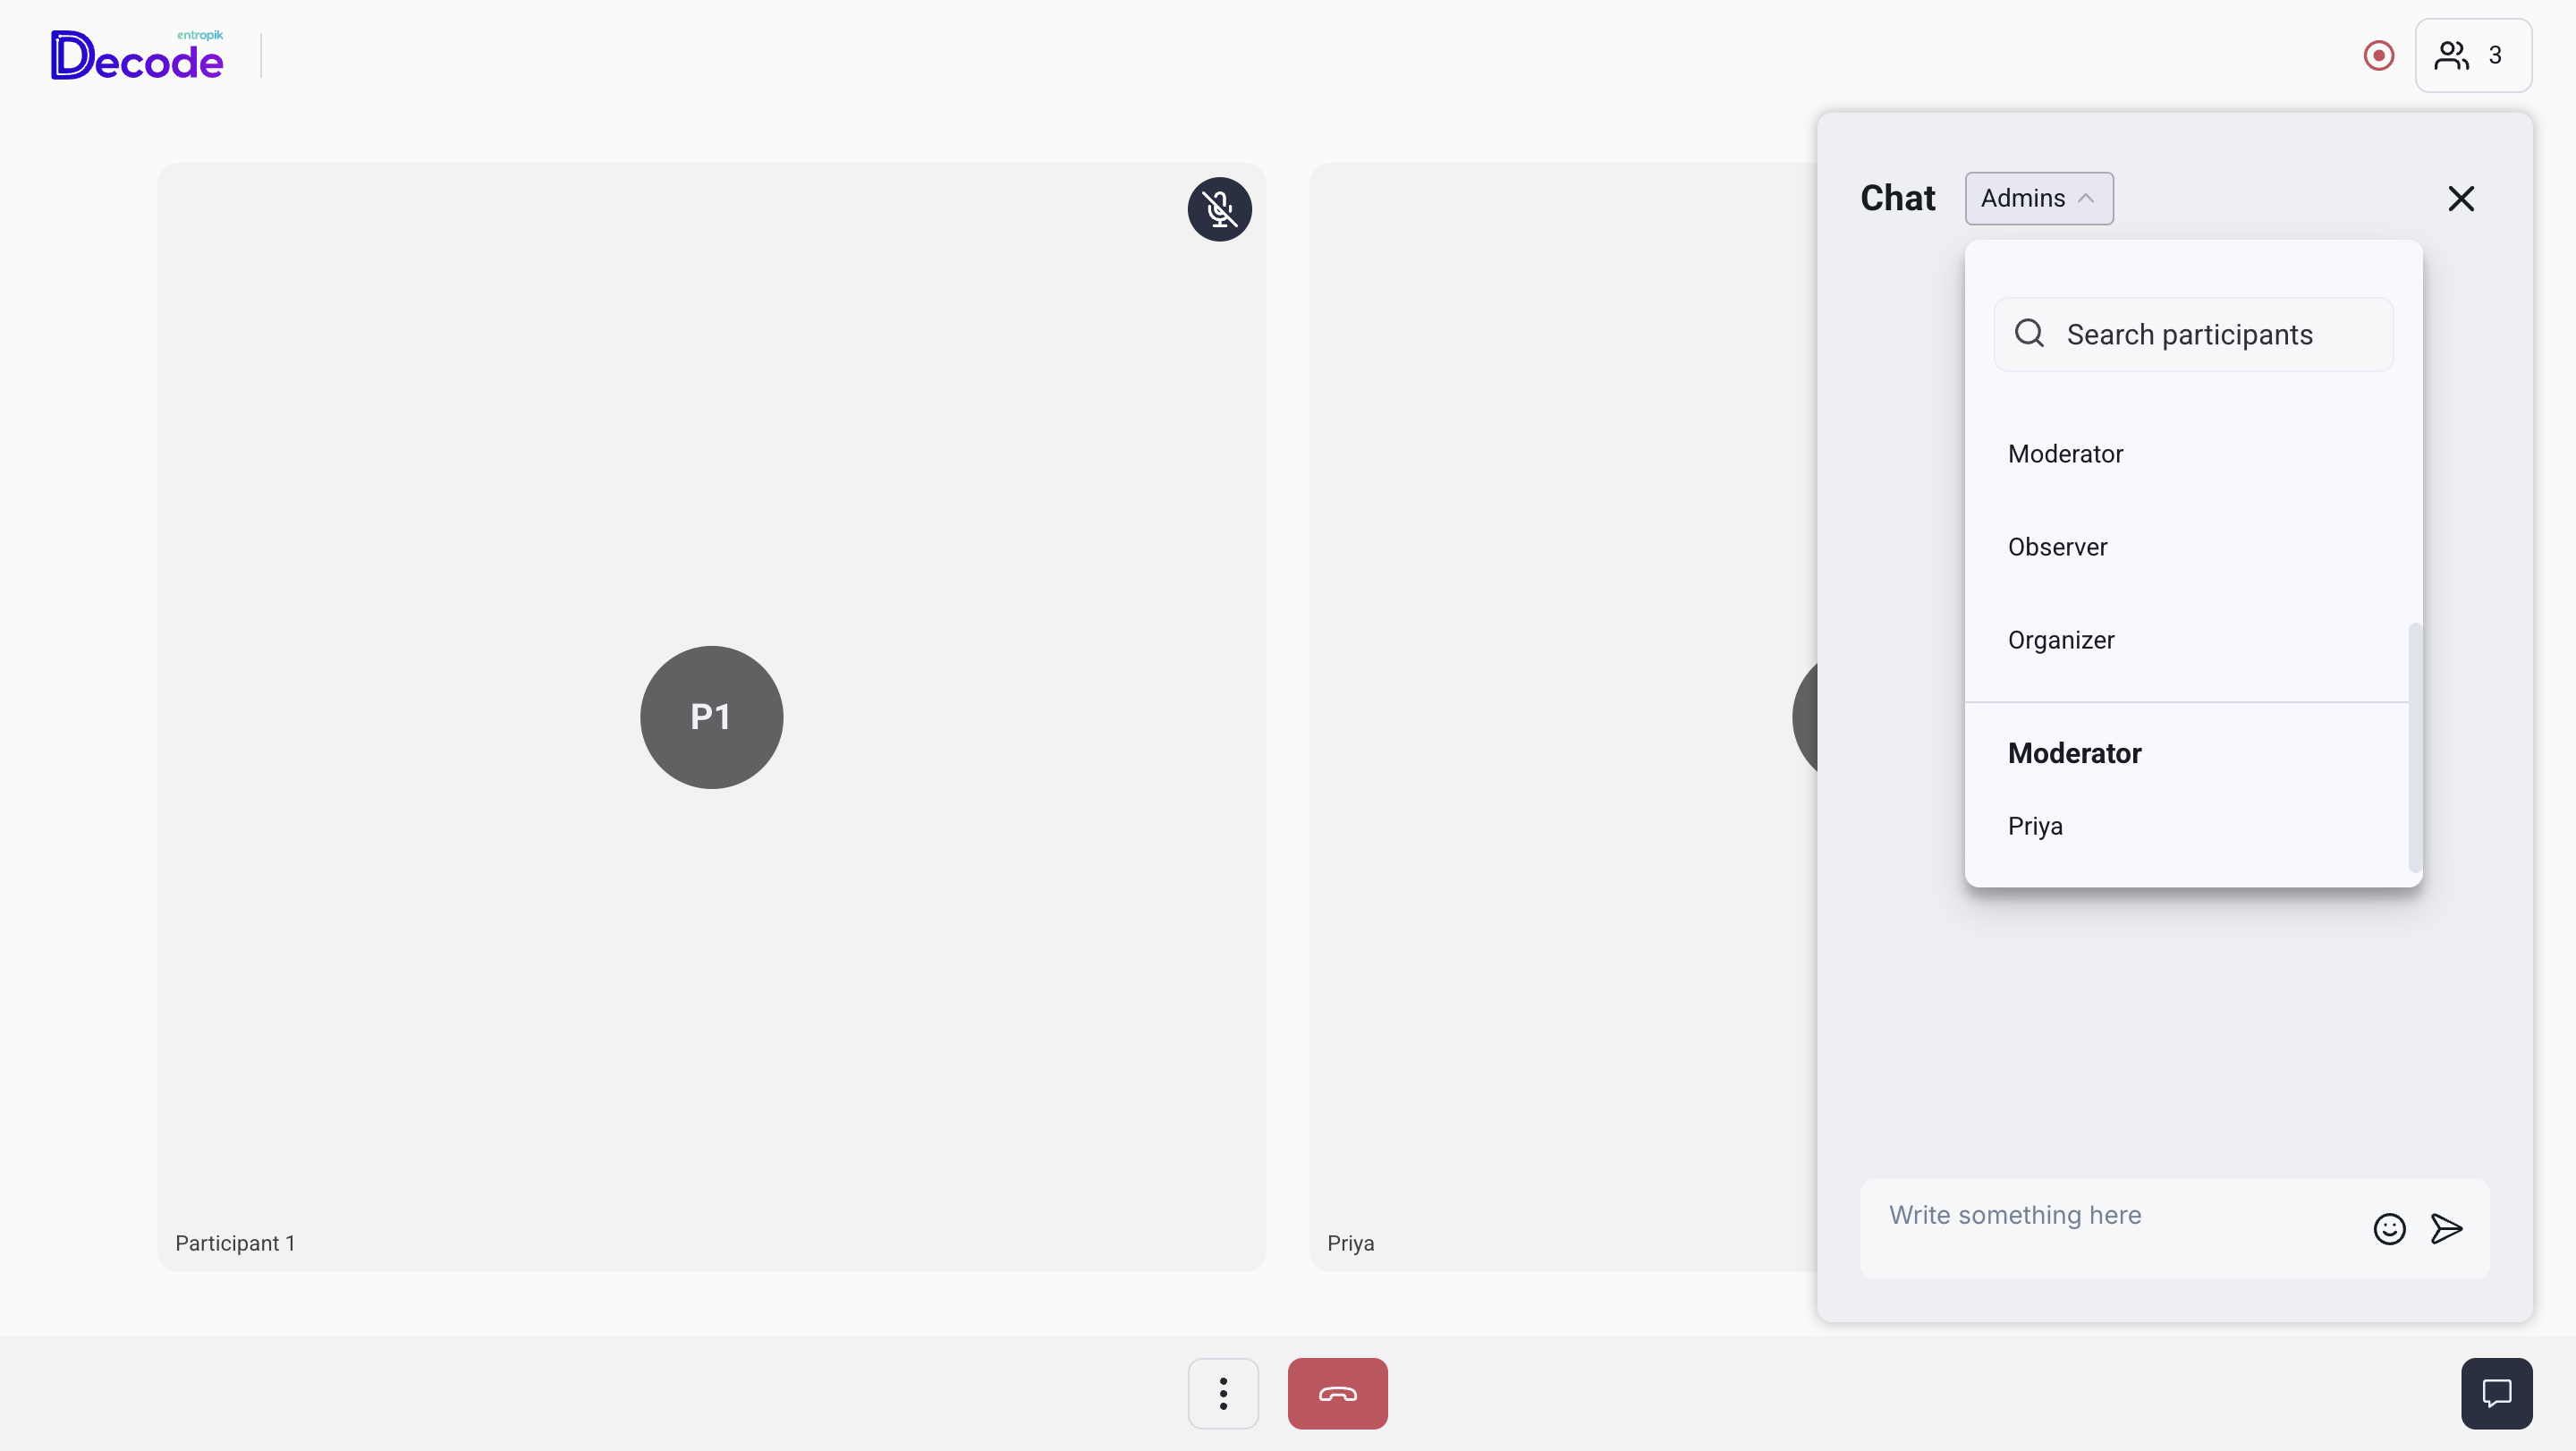
8. Chat
Opens the chat panel where you can send text messages during the session. The recipient dropdown lets you control who sees the message.
- Admins: Sends the message to all admin-level roles. Use this to communicate with additional moderators or observers without the participant seeing it.
- Everyone: Sends the message to all participants in the session. Use this to share a link or instruction that all participants need to see.
- By Role or Individual: Send directly to a specific role or person. Use this for targeted communication during the session.
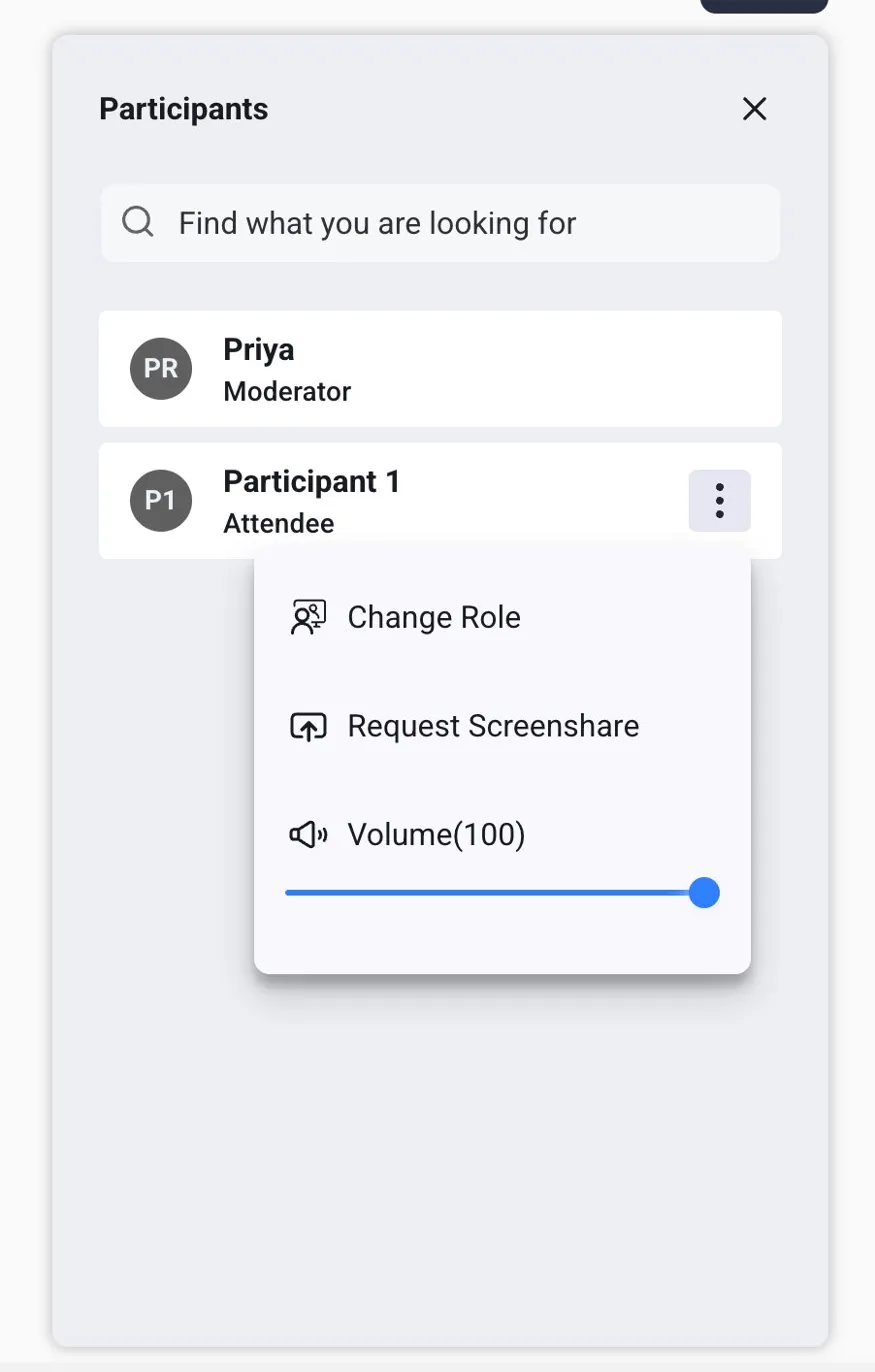
9. Participants Panel
Click the participant count icon in the top right to open the Participants panel. This shows everyone currently in the session with their role. Click the three-dot menu next to any participant for the following options:
- Change Role: Change the participant's role from Attendee to Moderator during the session.
- Request Screenshare: Send a screen share request to the participant. They will see a prompt asking if they are okay to share their screen publicly. If they click Yes, the screen share option is enabled for them. If they click No, the request is declined.
- Volume: Adjust the volume for that specific participant independently without affecting others in the session.
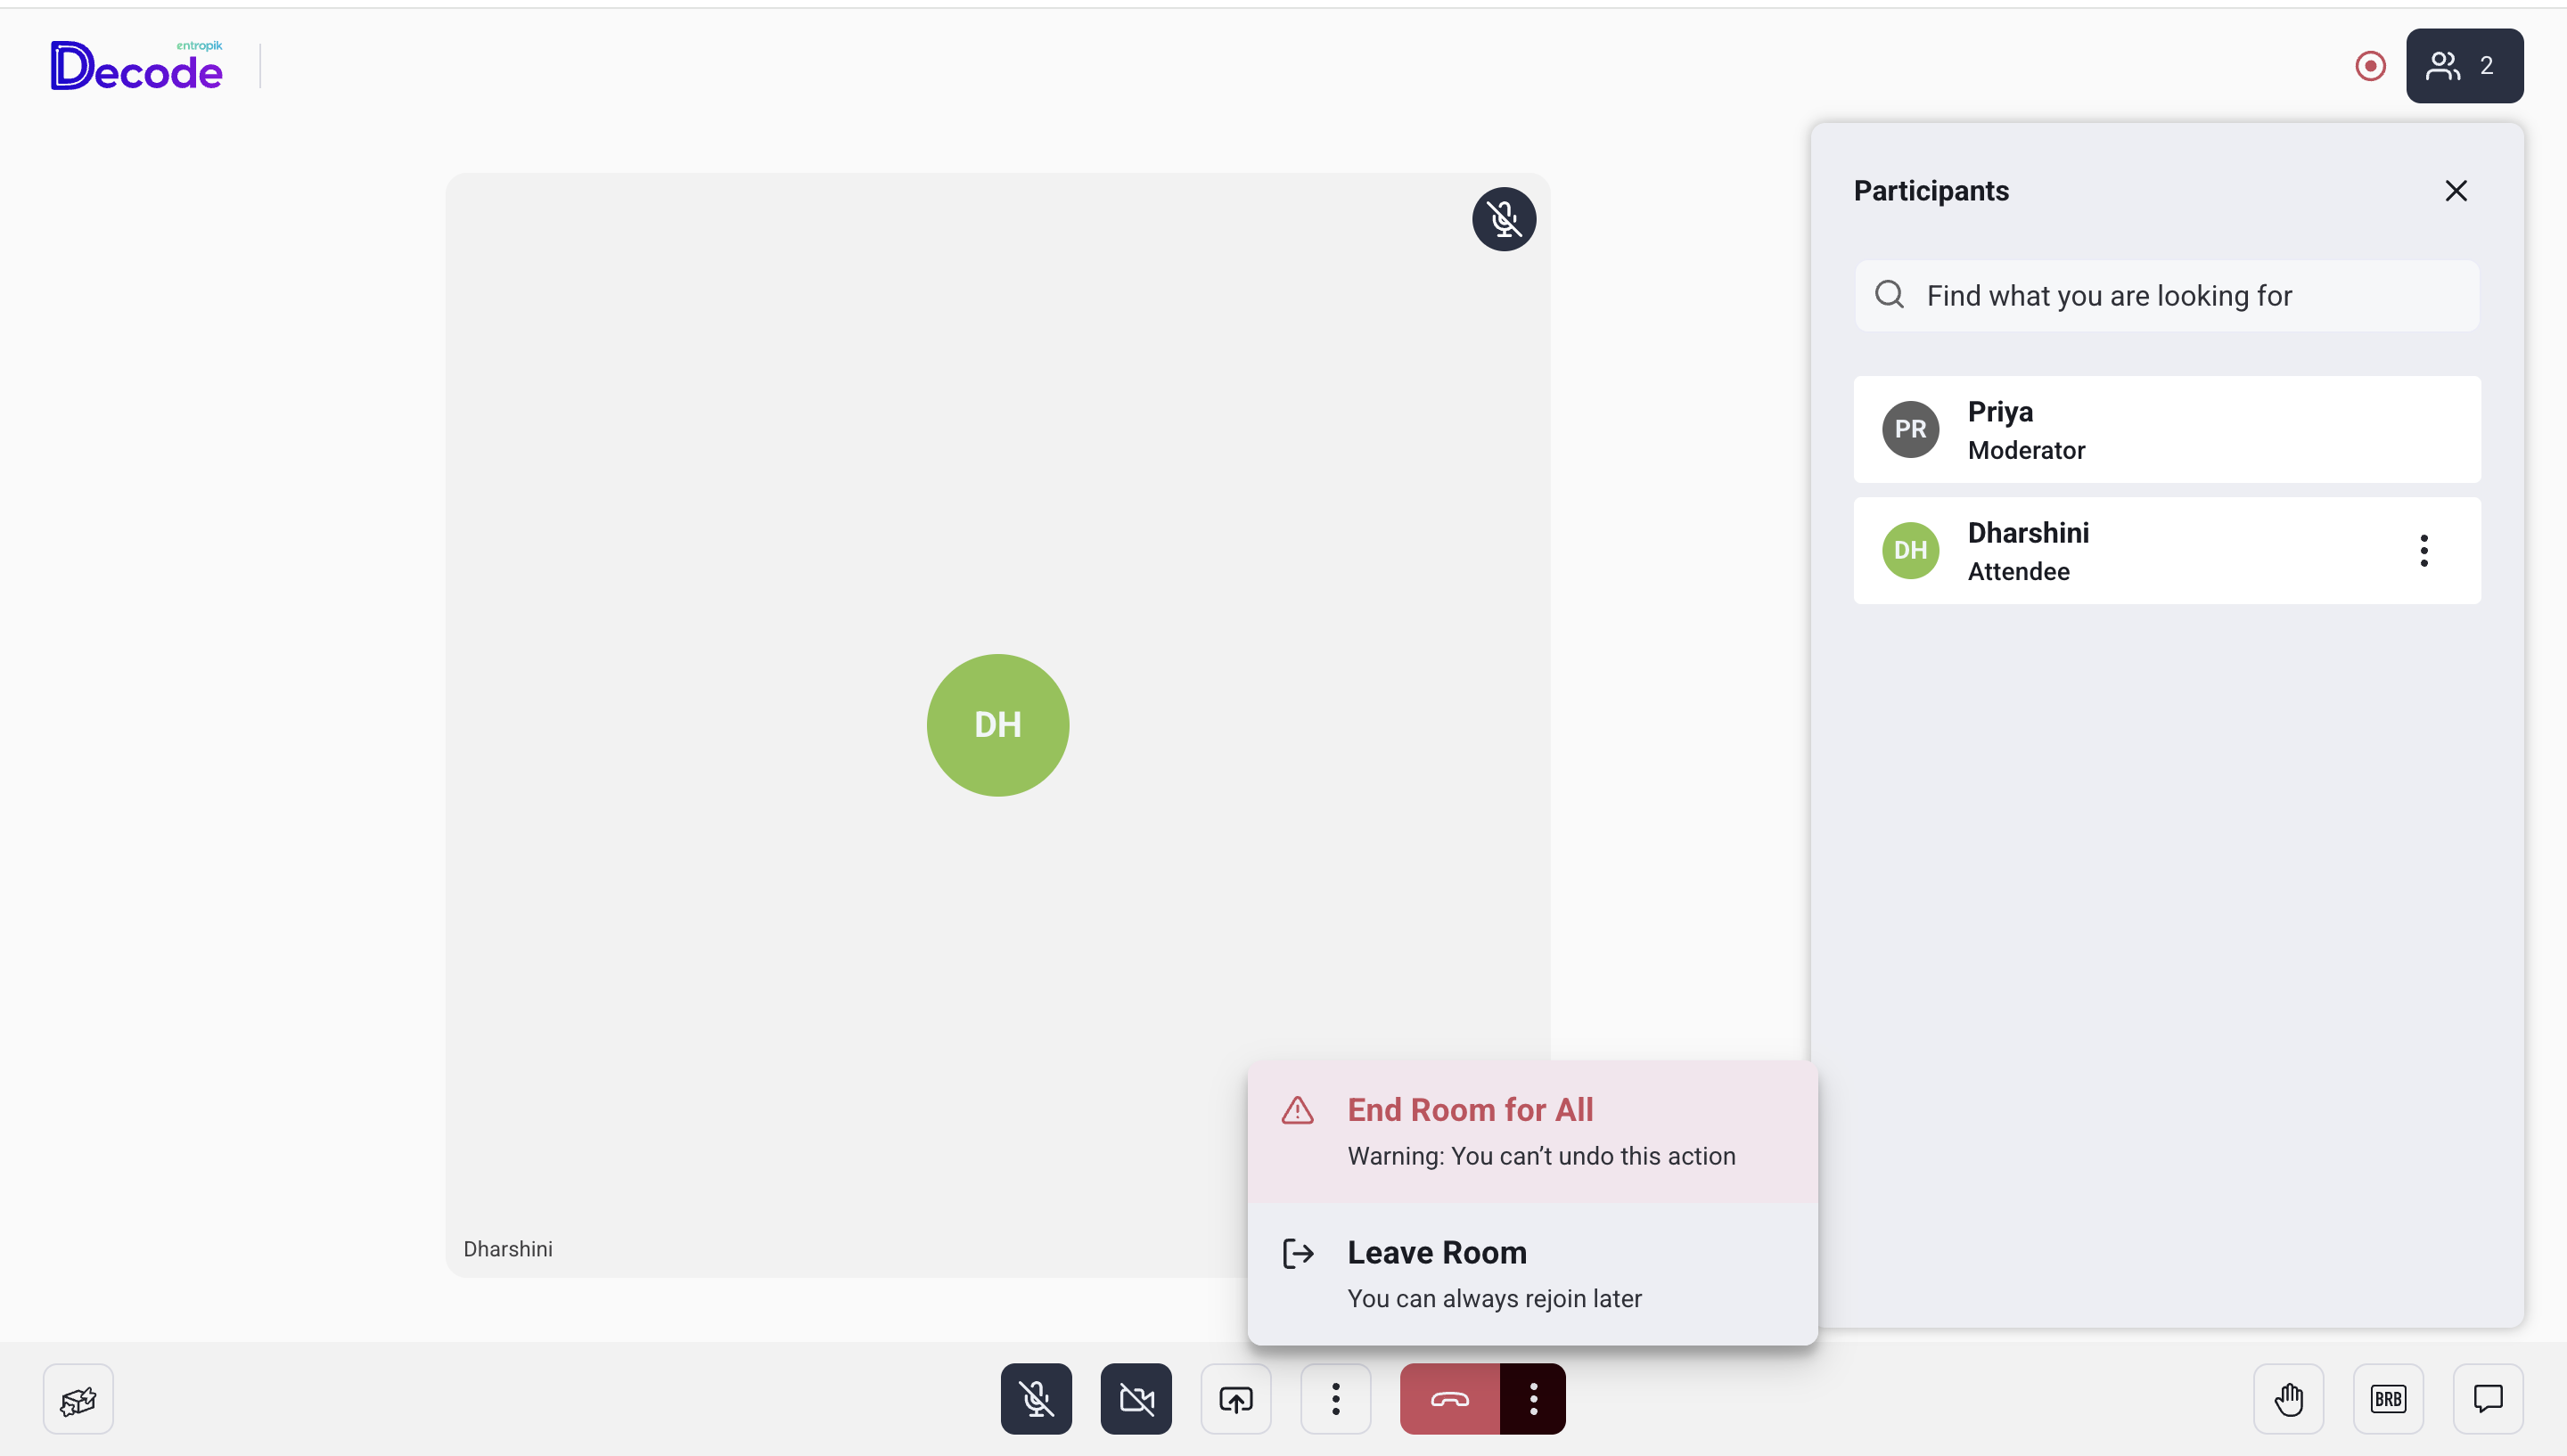
10. End Session
Click the red End Call button to end or leave the session. Two options appear.
- End Room for All: Ends the session for everyone immediately. Use this when the session is complete and you want to close the room for all participants.
- Leave Room: You exit the session but the room stays open for others. Use this if you need to leave early but the session should continue.
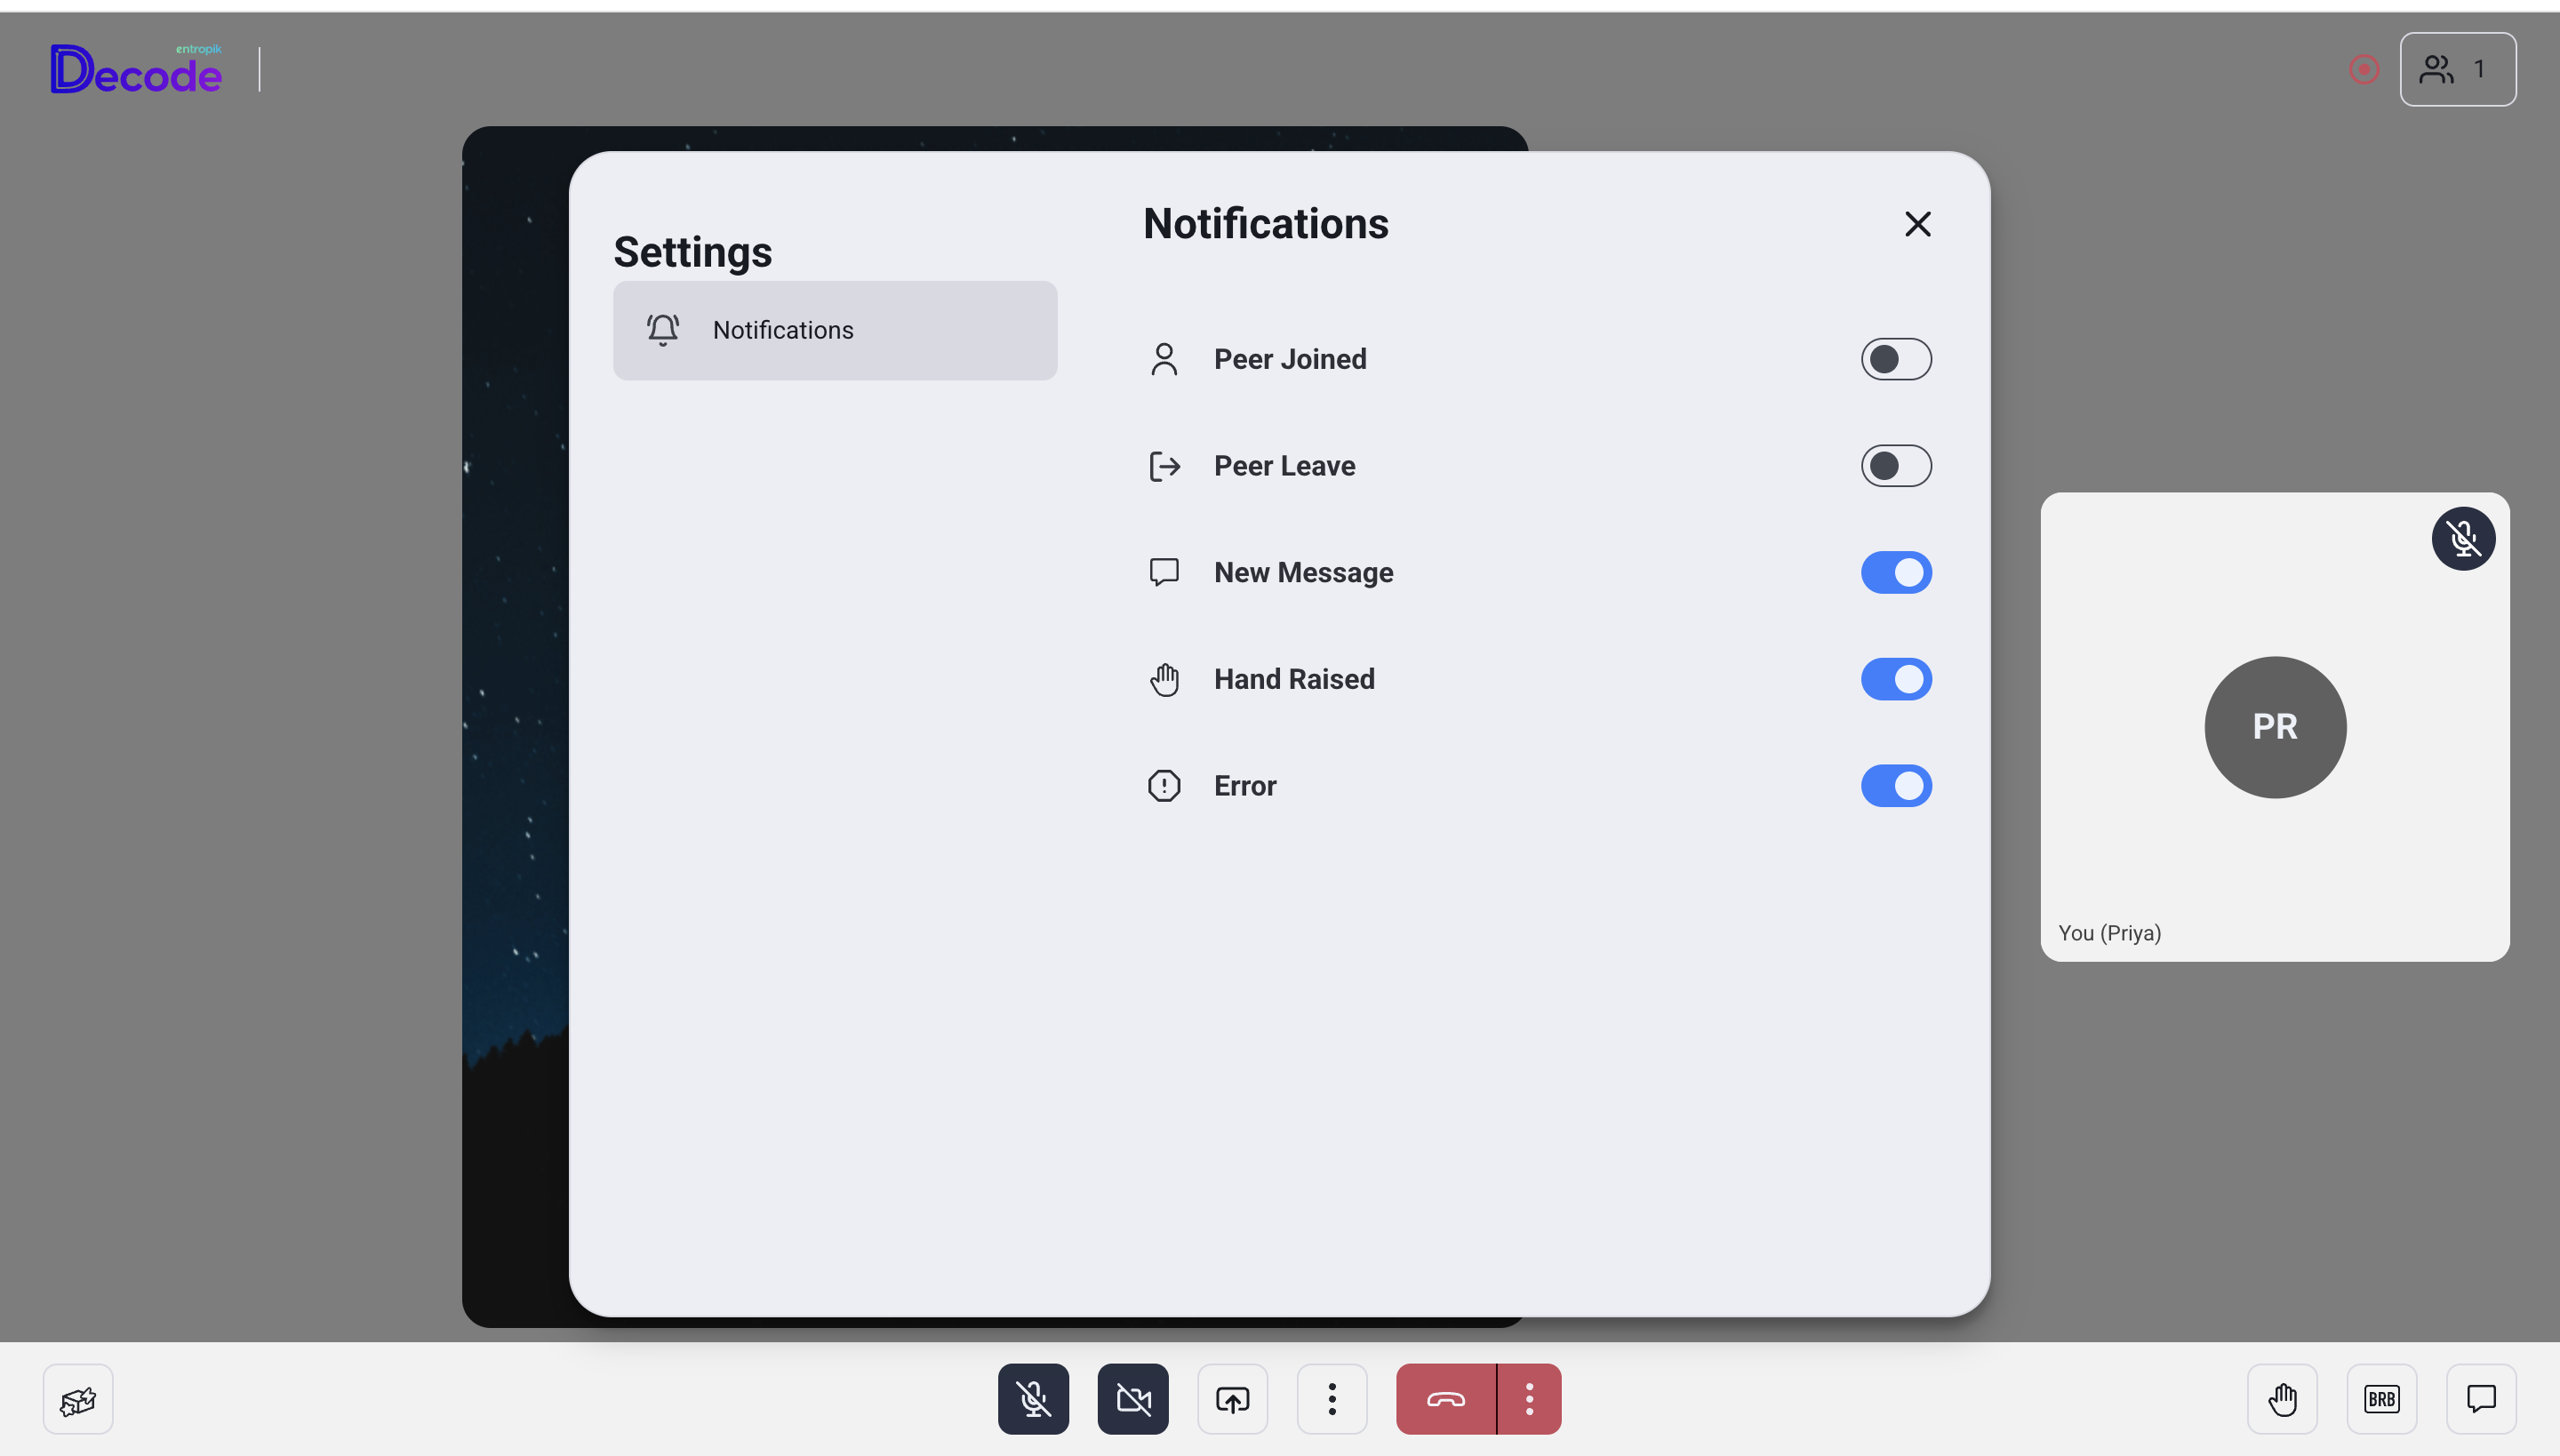
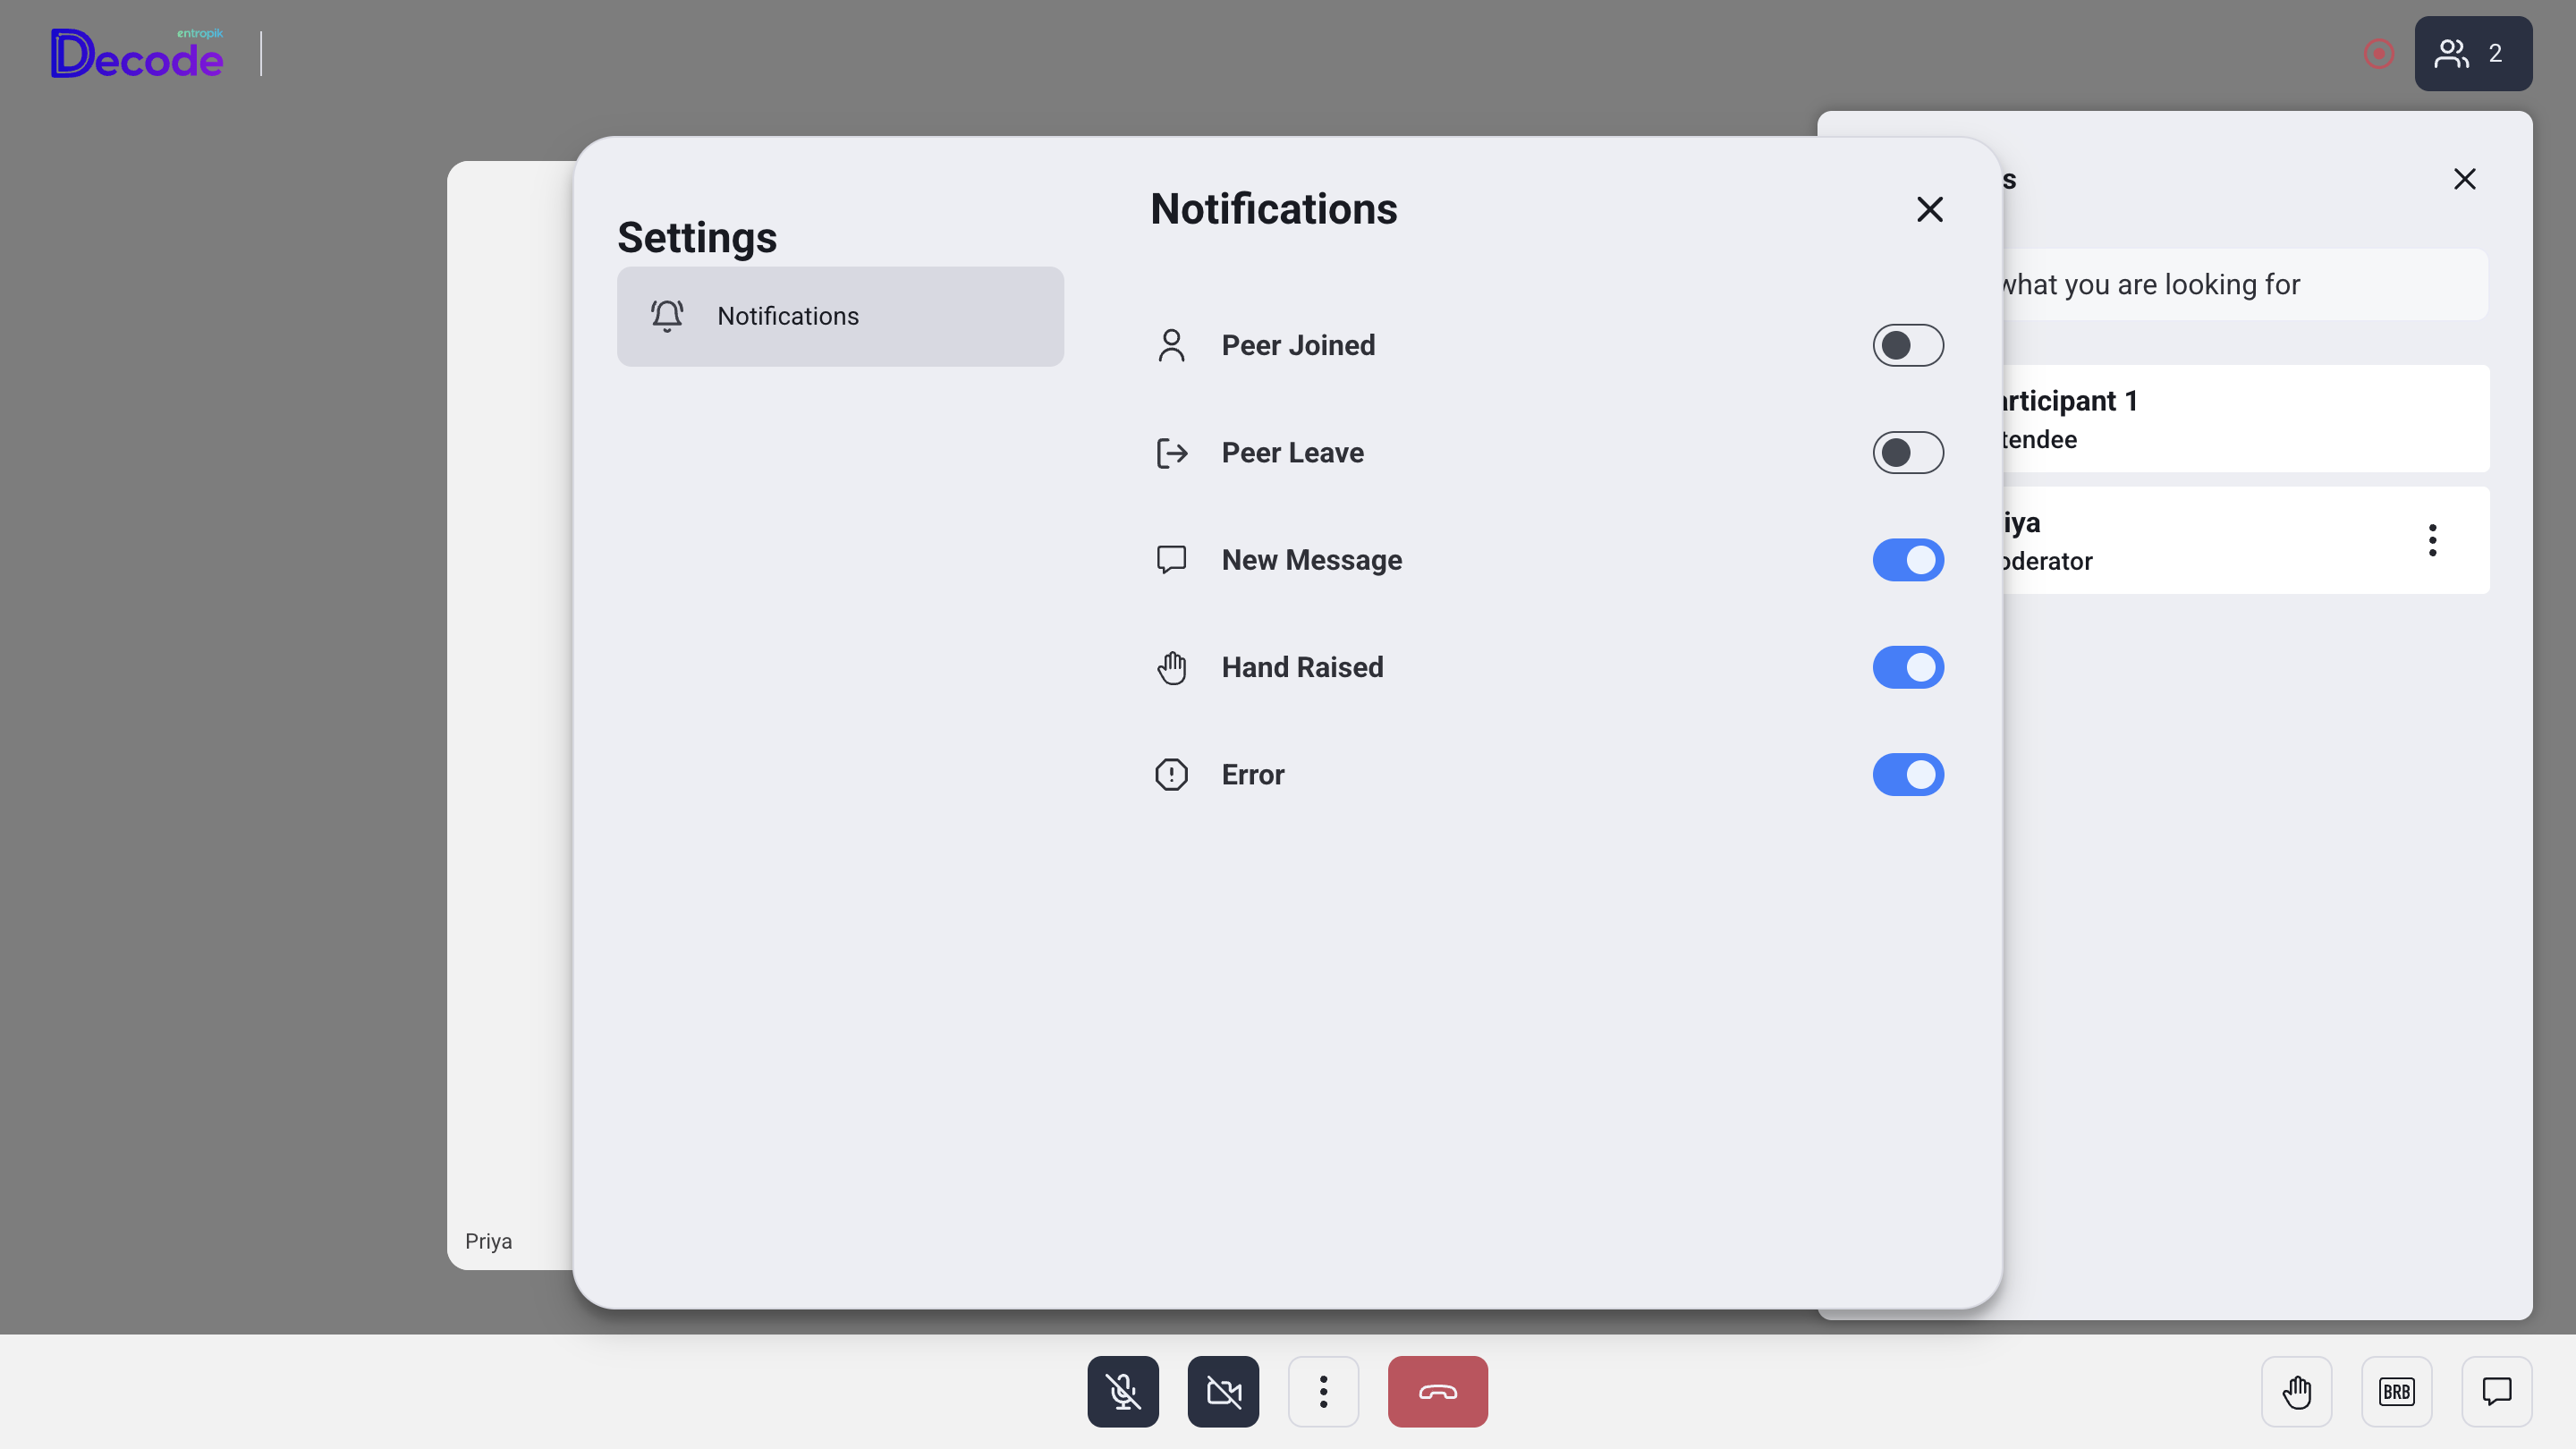
11. Settings
Access Settings from the More Options menu. Use this to configure your audio and notification preferences before or during the session.
- Speaker: Select and test your audio output device. Use this to make sure you can hear the participant clearly before starting.
- Notifications: Toggle alerts for session events such as Peer Joined, Peer Leave, New Message, Hand Raised, and Error. Turn these on to stay aware of session activity without having to watch the screen constantly.
PARTICIPANT
The participant attends the session to complete tasks or answer questions as directed by the moderator. They join using a link from their calendar invite and wait to be admitted before the session begins.
How to Join
Participants open the join link from their calendar invite. On the Decode Live screen, they have two ways to join.
1. Join as a participant: Enter Email ID and a Display Name, then click Join Meeting.
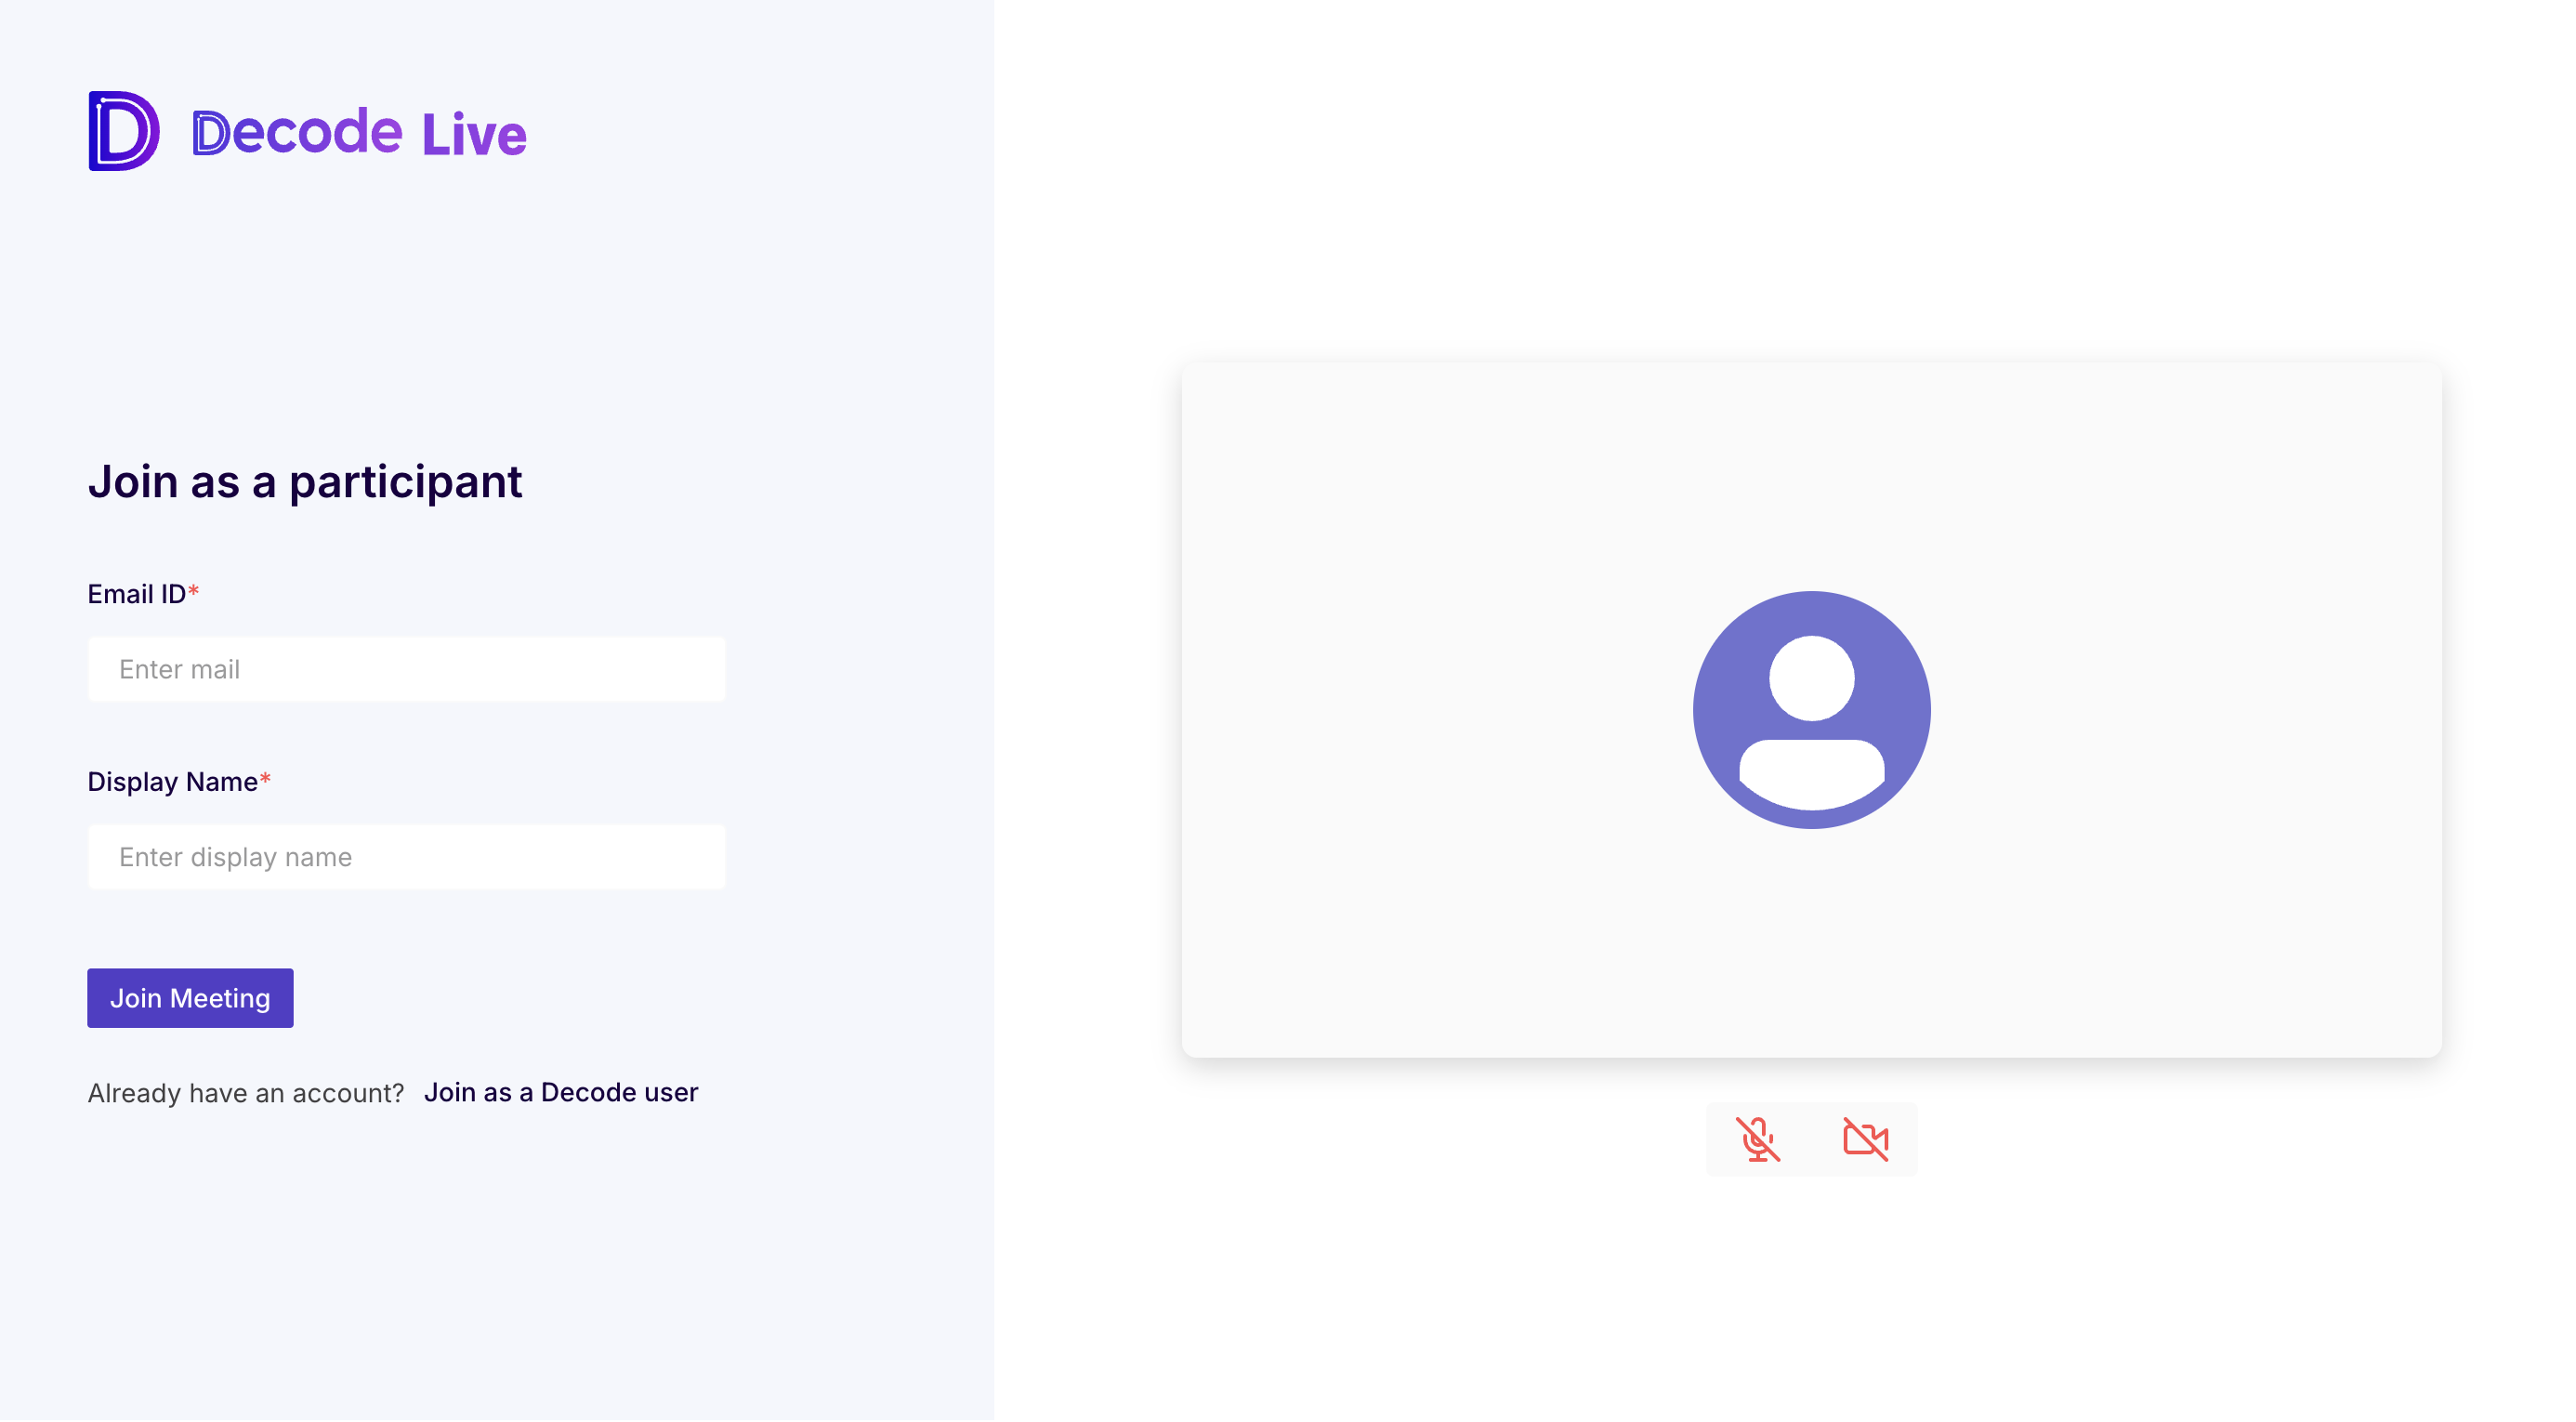
2. Join as a Decode user: If the participant has a Decode account, they can click Join as a Decode user and sign in with their credentials.

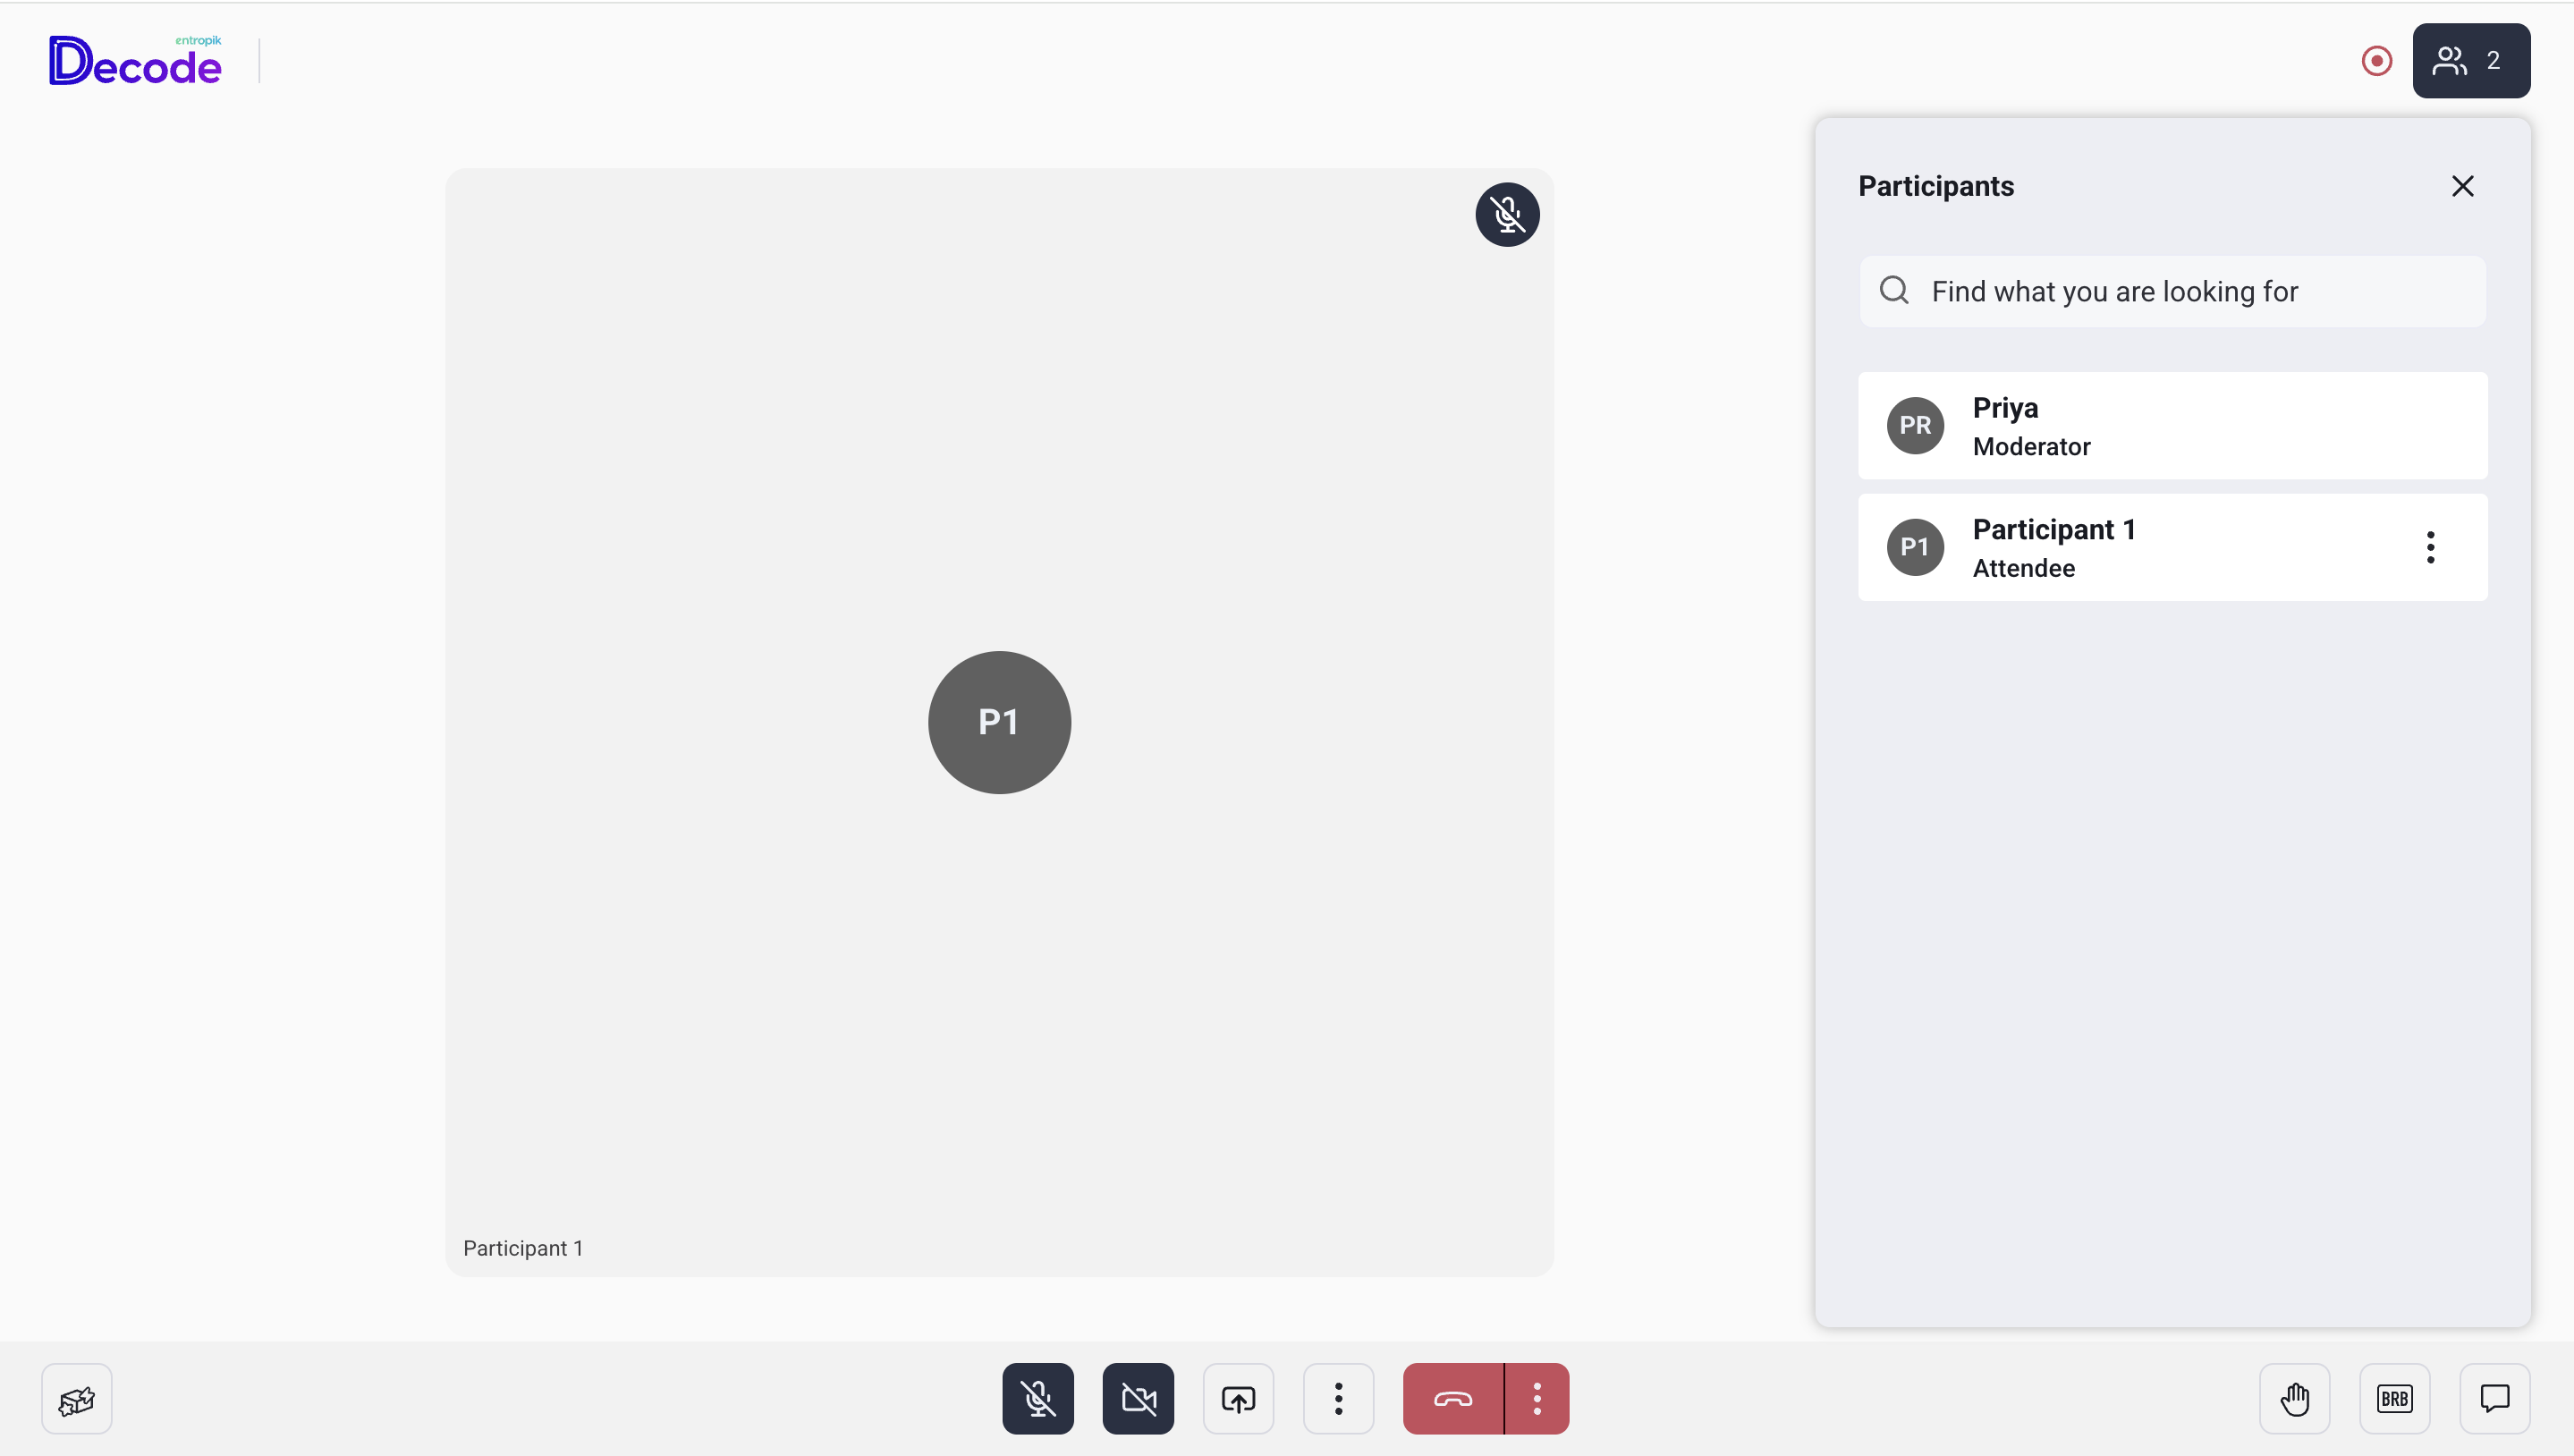
After joining, a waiting screen appears with the message that the meeting host will let them in soon. The participant waits here until the moderator admits them. Once admitted, the moderator appears in the main view and the participant's own tile appears on the right side of the screen.
Session Features
The following features are available to the participant during a live session.
1. Microphone
Mute or unmute audio during the session.
2. Camera
Turn your video on or off during the session.
3. Hand Raise
Raises a hand signal visible to the moderator. Participants can use this to indicate they have a question or want to speak without interrupting the moderator.
4. BRB (Be Right Back)
Marks the participant as temporarily away. Their tile shows a Be Right Back status to everyone in the session.
5. Chat
Opens the chat panel. Participants can send messages to specific roles in the session using the recipient dropdown.
- Moderator: Sends a message directly to the moderator. Use this to share something in text, such as a link or a clarification, without interrupting the spoken conversation.
- Interpreter: Sends a message to any interpreter in the session.
- Organizer: Sends a message to the session organizer.
Participants can also search by name to send a message to a specific individual in the session.
6. Settings
Access Settings from the More Options menu.
- Speaker: Select and test the audio output device. Participants should check this before the session starts to make sure they can hear the moderator clearly.
- Notifications: Toggle alerts for session events such as Peer Joined, Peer Leave, New Message, Hand Raised, and Error.
7. Leave Session
Click the red End Call button to leave the session. Participants can only leave the session for themselves. They cannot end the room for others.
OBSERVER
The observer watches the session without participating. They are not visible or audible to the moderator or participant. Observers are typically team members or stakeholders who want to follow the session in real time.
How to Join
Observers open the observer join link from their calendar invite. On the Decode Live screen, they have two ways to join.
1. Join as an observer: Enter Email ID and a Display Name, then click Join Meeting.

2. Join as a Decode user: If the observer has a Decode account, they can click Join as a Decode user and sign in with their credentials.
Once inside the session, the observer can see and hear the moderator and participant. The observer is not visible or audible to anyone in the session.
Session Features
The observer has the following controls during a live session.
1. Chat
Observers can use the chat panel to communicate with the research team privately during the session. This is useful for sharing real-time observations or flagging moments of interest without interrupting the session.
- Admins: Sends a message to all admin-level roles in the session. Use this to communicate with the moderator or other team members.
- Moderator: Sends a message directly to the moderator. Use this to flag something specific you want the moderator to follow up on during the session.
- Observers cannot send messages to participants.
2. Settings
Access Settings from the More Options menu.
- Speaker: Select and test the audio output device. Use this to make sure audio from the session is coming through clearly.
- Notifications: Toggle alerts for session events.
3. Leave Session
Click the red End Call button to leave the session. Observers can only leave for themselves. They cannot end the room for others.
What Each Role Can Do
Use the table below as a quick reference for the features available to each role inside a live session.
| Moderator | Participant | Observer |
Microphone and Camera | Yes | Yes | No |
Screen Share | Yes | On Request | No |
Admit / Deny participants | Yes | No | No |
Mute All | Yes | No | No |
End session for all | Yes | No | No |
Hand Raise | Yes | Yes | No |
BRB | Yes | Yes | No |
Chat with everyone | Yes | No | No |
Chat with moderator | Yes | Yes | Yes |
Chat with participants | Yes | Yes | No |
Leave session | Yes | Yes | Yes |
Settings | Yes | Yes | Yes |